Press Run to start the engine: its live metrics show here.
A Appendix A - MagPi Articles
Appendix A collects all the Sonic Pi articles written for the MagPi
magazine.
Dive into Topics
These articles aren’t meant to be read in any strict order and contain a
lot of cross-over material from the tutorial itself. Rather than try and
teach you all of Sonic Pi, they instead each focus on a specific aspect
of Sonic Pi and cover it in a fun and accessible way.
Read the MagPi
You can see them in their glorious professionally typeset form in the
free PDF downloads of The MagPi here: https://www.raspberrypi.org/magpi/
Suggest a Topic
If you don’t see a topic that interests you covered in these articles -
why not suggest one? The easiest way to do that is to tweet your
suggestion to @Sonic_Pi. You never know -
your suggestion might be the subject of the next article!
A.1 Tips for Sonic Pi
1. There are no mistakes
The most important lesson to learn with Sonic Pi is that there really
are no mistakes. The best way to learn is to just try and try and
try. Try lots of different things out, stop worrying whether your code
sounds good or not and start experimenting with as many different
synths, notes, FX and opts as possible. You’ll discover a lot of things
that make you laugh because they sound just awful and some real gems
that sound truly amazing. Simply drop the things you don’t like and keep
the things you do. The more ‘mistakes’ you allow yourself to make the
quicker you’ll learn and discover your personal coding sound.
2. Use the FX
Say you’ve already mastered the Sonic Pi basics of making sounds with
sample, play? What’s next? Did you know that Sonic Pi supports over
27 studio FX to change the sound of your code? FX are like fancy image
filters in drawing programs except that instead of blurring or making
something black and white, you can add things like reverb, distortion
and echo to your sound. Think of it like sticking the cable from your
guitar to an effects pedal of your choice and then into the
amplifier. Luckily, Sonic Pi makes using FX really easy and requires no
cables! All you need to do is to choose which section of your code you’d
like the FX added to and wrap it with the FX code. Let’s look at an
example. Say you had the following code:
2. Use the FX
sample :loop_garzul
16.times do
sample :bd_haus
sleep 0.5
end
If you wanted to add FX to the :loop_garzul sample, you’d just tuck it
inside a with_fx block like this:
2. Use the FX · 2
with_fx :flangerdo
sample :loop_garzul
end
16.times do
sample :bd_haus
sleep 0.5
end
Now, if you wanted to add FX to the bass drum, go and wrap that with
with_fx too:
2. Use the FX · 3
with_fx :flangerdo
sample :loop_garzul
end
with_fx :echodo
16.times do
sample :bd_haus
sleep 0.5
end
end
Remember, you can wrap any code within with_fx and any sounds
created will pass through that FX.
3. Parameterise your synths
In order to really discover your coding sound you’ll soon want to know
how to modify and control synths and FX. For example, you might want to
change the duration of a note, add more reverb, or change the time
between echoes. Luckily, Sonic Pi gives you an amazing level of control
to do exactly this with special things called optional parameters or
opts for short. Let’s take a quick look. Copy this code into a workspace
and hit run:
3. Parameterise your synths
sample :guit_em9
Ooh, a lovely guitar sound! Now, let’s start playing with it. How about
changing its rate?
3. Parameterise your synths · 2
sample :guit_em9, rate:0.5
Hey, what’s that rate:0.5 bit I just added at the end? That’s called
an opt. All of Sonic Pi’s synths and FX support them and there’s loads
to play around with. They’re also available for FX too. Try this:
3. Parameterise your synths · 3
with_fx :flanger, feedback:0.6do
sample :guit_em9
end
Now, try increasing that feedback to 1 to hear some fun sounds! Read the
docs for full details on all the many opts available to you.
4. Live Code
The best way to quickly experiment and explore Sonic Pi is to live
code. This allows you to start off some code and continually change and
tweak it whilst it’s still playing. For example, if you don’t know what
the cutoff parameter does to a sample, just play around. Let’s have a try!
Copy this code into one of your Sonic Pi workspaces:
4. Live Code
live_loop :experimentdo
sample :loop_amen, cutoff:70
sleep 1.75
end
Now, hit run and you’ll hear a slightly muffled drum break. Now, change
the cutoff: value to 80 and hit run again. Can you hear the
difference? Try 90, 100, 110…
Once you get the hang of using live_loops you’ll not turn
back. Whenever I do a live coding gig I rely on live_loop as much as a
drummer relies on their sticks. For more information about live coding
check out Section 9 of the built-in tutorial.
5. Surf the random streams
Finally, one thing I love doing is cheating by getting Sonic Pi to
compose things for me. A really great way to do this is using
randomisation. It might sound complicated but it really isn’t. Let’s
take a look. Copy this into a spare workspace:
play notes.choose, release:0.1, cutoff: rrand(70, 120)
sleep 0.125
end
end
Now, when you play this, you’ll hear a constant stream of random notes
from the scale :e2:minor_pentatonic played with the :dsaw
synth. “Wait, wait! That’s not a melody”, I hear you shout! Well, here’s
the first part of the magic trick. Every time we go round the
live_loop we can tell Sonic Pi to reset the random stream to a known
point. This is a bit like going back in time in the TARDIS with the
Doctor to a particular point in time and space. Let’s try it - add the
line use_random_seed 1 to the live_loop:
play notes.choose, release:0.1, cutoff: rrand(70, 120)
sleep 0.125
end
end
Now, every time the live_loop loops around, the random stream is
reset. This means it chooses the same 16 notes every time. Hey presto!
An instant melody. Now, here’s the really exciting bit. Change the seed
value from 1 to another number. Say 4923. Wow! Another melody! So,
just by changing one number (the random seed), you can explore as many
melodic combinations as you can imagine! Now, that’s the magic of code.
A.2 Live Coding
The laser beams sliced through the wafts of smoke as the subwoofer
pumped bass deep into the bodies of the crowd. The atmosphere was ripe
with a heady mix of synths and dancing. However something wasn’t quite
right in this nightclub. Projected in bright colours above the DJ booth
was futuristic text, moving, dancing, flashing. This wasn’t fancy
visuals, it was merely a projection of Sonic Pi running on a Raspberry
Pi. The occupant of the DJ booth wasn’t spinning disks, they wrote,
edited and evaluated code. Live. This is Live Coding.
This may sound like a far fetched story from a futuristic night club but
coding music like this is a growing trend and is often described as Live
Coding (http://toplap.org). One of the recent directions this approach
to music making has taken is the Algorave (http://algorave.com) - events
where artists like myself code music for people to dance to. However,
you don’t need to be in a nightclub to Live Code - with Sonic Pi v2.6+
you can do it anywhere you can take your Raspberry Pi and a pair of
headphones or some speakers. Once you reach the end of this article,
you’ll be programming your own beats and modifying them live. Where you
go afterwards will only be constrained by your imagination.
Live Loop
The key to live coding with Sonic Pi is mastering the live_loop. Let’s
look at one:
Live Loop
live_loop :beatsdo
sample :bd_haus
sleep 0.5
end
There are 4 core ingredients to a live_loop. The first is its
name. Our live_loop above is called :beats. You’re free to call your
live_loop anything you want. Go wild. Be creative. I often use names
that communicate something about the music they’re making to the
audience. The second ingredient is the do word which marks where the
live_loop starts. The third is the end word which marks where the
live_loop finishes, and finally there is the body of the live_loop
which describes what the loop is going to repeat - that’s the bit
between the do and end. In this case we’re repeatedly playing a bass
drum sample and waiting for half a beat. This produces a nice regular
bass beat. Go ahead, copy it into an empty Sonic Pi buffer and hit
run. Boom, Boom, Boom!.
Redefining On-the-fly
Ok, so what’s so special about the live_loop? So far it just seems
like a glorified loop! Well, the beauty of live_loops is that you
can redefine them on-the-fly. This means that whilst they’re still
running, you can change what they do. This is the secret to live coding
with Sonic Pi. Let’s have a play:
Redefining On-the-fly
live_loop :choral_dronedo
sample :ambi_choir, rate:0.4
sleep 1
end
Now press the Run button or hit Meta-r. You’re now listening to
some gorgeous choir sounds. Now, whilst it’s still playing, change the
rate from 0.4 to 0.38. Hit run again. Woah! Did you hear the choir
change note? Change it back up to 0.4 to return back to how it
was. Now, drop it to 0.2, down to 0.19 and then back up to
0.4. See how changing just one parameter on the fly can give you real
control of the music? Now play around with the rate yourself - choose
your own values. Try negative numbers, really small numbers and large
numbers. Have fun!
Sleeping is important
One of the most important lessons about live_loops is that they need
rest. Consider the following live_loop:
Sleeping is important
live_loop :infinite_impossibilitiesdo
sample :ambi_choir
end
If you try running this code, you’ll immediately see Sonic Pi
complaining that the live_loop did not sleep. This is a safety system
kicking in! Take a moment to think about what this code is asking the
computer to do. That’s right, it’s asking the computer to play an
infinite amount of choir samples in zero time. Without the safety system
the poor computer will try and do this and crash and burn in the
process. So remember, your live_loops must contain a sleep.
Combining Sounds
Music is full of things happening at the same time. Drums at the same
time as bass at the same time as vocals at the same time as
guitars… In computing we call this concurrency and Sonic Pi provides
us with an amazingly simple way of playing things at the same
time. Simply use more than one live_loop!
Here, we have two live_loops, one looping quickly making beats and
another looping slowly making a wild bass sound.
One of the interesting things about using multiple live_loops is that
they each manage their own time. This means it’s really easy to create
interesting polyrhythmical structures and even play with phasing Steve
Reich style. Check this out:
In each of these tutorials, we’ll end with a final example in the form
of a new piece of music which draws from all of the ideas
introduced. Read this code and see if you can imagine what it’s
doing. Then, copy it into a fresh Sonic Pi buffer and hit Run and
actually hear what it sounds like. Finally, change one of the numbers or
comment and uncomment things out. See if you can use this as a starting
point for a new performance, and most of all have fun! See you next
time…
One of the most exciting and disrupting technical developments in modern
music was the invention of samplers. These were boxes that allowed you
to record any sound into them and then manipulate and play back those
sounds in many interesting ways. For example, you could take an old
record, find a drum solo (or break), record it into your sampler and
then play it back on repeat at half-speed to provide the foundation for
your latest beats. This is how early hip-hop music was born and today
it’s almost impossible to find electronic music that doesn’t incorporate
samples of some kind. Using samples is a really great way of easily
introducing new and interesting elements into your live coded
performances.
So where can you get a sampler? Well you already have one - it’s your
Raspberry Pi! The built-in live coding app Sonic Pi has an extremely
powerful sampler built into its core. Let’s play with it!
The Amen Break
One of the most classic and recognisable drum break samples is called
the Amen Break. It was first performed in 1969 in the song “Amen
Brother” by the Winstons as part of a drum break. However, it was when
it was discovered by early hip-hop musicians in the 80s and used in
samplers that it started being heavily used in a wide variety of other
styles such as drum and bass, breakbeat, hardcore techno and breakcore.
I’m sure you’re excited to hear that it’s also built right into Sonic
Pi. Clear up a buffer and throw in the following code:
The Amen Break
sample :loop_amen
Hit Run and boom! You’re listening to one of the most influential
drum breaks in the history of dance music. However, this sample wasn’t famous
for being played as a one-shot, it was built for being looped.
Beat Stretching
Let’s loop the Amen Break by using our old friend the live_loop
introduced in this tutorial last month:
Beat Stretching
live_loop :amen_breakdo
sample :loop_amen
sleep 2
end
OK, so it is looping, but there’s an annoying pause every time
round. That is because we asked it to sleep for 2 beats and with
the default BPM of 60 the :loop_amen sample only lasts for 1.753
beats. We therefore have a silence of 2 - 1.753 = 0.247 beats. Even
though it’s short, it’s still noticeable.
To fix this issue we can use the beat_stretch: opt to ask Sonic Pi to
stretch (or shrink) the sample to match the specified number of beats.
Sonic Pi’s sample and synth fns give you a lot
of control via optional parameters such as amp:, cutoff: and
release:. However, the term optional parameter is a real mouthful so
we just call them opts to keep things nice and simple.
Beat Stretching · 2
live_loop :amen_breakdo
sample :loop_amen, beat_stretch:2
sleep 2
end
Now we’re dancing! Although, perhaps we want to speed it up or slow it down
to suit the mood.
Playing with Time
OK, so what if we want to change styles to old school hip hop or
breakcore? One simple way of doing this is to play with time - or in
other words mess with the tempo. This is super easy in Sonic Pi - just
throw in a use_bpm into your live loop:
Playing with Time
live_loop :amen_breakdo
use_bpm 30
sample :loop_amen, beat_stretch:2
sleep 2
end
Whilst you’re rapping over those slow beats, notice that we’re still
sleeping for 2 and our BPM is 30, yet everything is in time. The
beat_stretch opt works with the current BPM to make sure everything just works.
Now, here’s the fun part. Whilst the loop is still live, change the 30
in the use_bpm 30 line to 50. Woah, everything just got faster yet kept
in time! Try going faster - up to 80, to 120, now go wild and punch in
200!
Filtering
Now we can live loop samples, let’s look at some of the most fun opts
provided by the sample synth. First up is cutoff: which controls the
cutoff filter of the sampler. By default this is disabled but you can
easily turn it on:
Filtering
live_loop :amen_breakdo
use_bpm 50
sample :loop_amen, beat_stretch:2, cutoff:70
sleep 2
end
Go ahead and change the cutoff: opt. For example, increase it to 100,
hit Run and wait for the loop to cycle round to hear the change in the
sound. Notice that low values like 50 sound mellow and bassy and high
values like 100 and 120 are more full-sounding and raspy. This is
because the cutoff: opt will chop out the high frequency parts of the
sound just like a lawn-mower chops off the top of the grass. The
cutoff: opt is like the length setting - determining how much grass is
left over.
Slicing
Another great tool to play with is the slicer FX. This will chop (slice)
the sound up. Wrap the sample line with the FX code like this:
Slicing
live_loop :amen_breakdo
use_bpm 50
with_fx :slicer, phase:0.25, wave:0, mix:1do
sample :loop_amen, beat_stretch:2, cutoff:100
end
sleep 2
end
Notice how the sound bounces up and down a little more. (You can hear
the original sound without the FX by changing the mix: opt to 0.)
Now, try playing around with the phase: opt. This is the rate (in
beats) of the slicing effect. A smaller value like 0.125 will slice
faster and larger values like 0.5 will slice more slowly. Notice that
successively halving or doubling the phase: opts val tends to always
sound good. Finally, change the wave: opt to one of 0, 1, or 2 and
hear how it changes the sound. These are the various wave shapes. 0 is a
saw wave, (hard in, fade out) 1 is a square wave (hard in, hard out) and
2 is a triangle wave (fade in, fade out).
Bringing it all together
Finally, let’s go back in time and revisit the early Bristol drum and
bass scene with this month’s example. Don’t worry too much about what
all this means, just type it in, hit Run, then start live coding it by
changing opt numbers and see where you can take it. Please do share what
you create! See you next time…
Bringing it all together · 2
use_bpm 100
live_loop :amen_breakdo
p = [0.125, 0.25, 0.5].choose
with_fx :slicer, phase: p, wave:0, mix: rrand(0.7, 1) do
s = synth :square, note: bass_line.tick, sustain:4, cutoff:60
control s, cutoff_slide:4, cutoff:120
end
sleep 4
end
A.4 Synth Riffs
Whether it’s the haunting drift of rumbling oscillators or the detuned
punch of saw waves piercing through the mix, the lead synth plays an
essential role on any electronic track. In last month’s edition of this
tutorial series we covered how to code our beats. In this tutorial we’ll
cover how to code up the three core components of a synth riff - the
timbre, melody and rhythm.
OK, so power up your Raspberry Pi, crack open Sonic Pi v2.6+ and let’s
make some noise!
Timbral Possibilities
An essential part of any synth riff is changing and playing with the
timbre of the sounds. We can control the timbre in Sonic Pi in two ways
- choosing different synths for a dramatic change and setting the
various synth opts for more subtle modifications. We can also use FX,
but that’s for another tutorial…
Let’s create a simple live loop where we continually change the current
synth:
Take a look at the code. We’re simply ticking through a ring of synth
names (this will cycle through each of these in turn repeating the list
over and over). We pass this synth name to the use_synth fn (function)
which will change the live_loop’s current synth. We also play note
:e2 (E at the second octave), with a release time of 0.5 beats (half a
second at the default BPM of 60) and with the cutoff: opt set to 100.
Hear how the different synths have very different sounds even though
they’re all playing the same note. Now experiment and have a
play. Change the release time to bigger and smaller values. For example,
change the attack: and release: opts to see how different fade
in/out times have a huge impact on the sound. Finally change the
cutoff: opt to see how different cutoff values also massively
influence the timbre (values between 60 and 130 are good). See how many
different sounds you can create by just changing a few values. Once
you’ve mastered that, just head to the Synths tab in the Help system for
a full list of all the synths and all the available opts each individual
synth supports to see just how much power you have under your coding
fingertips.
Timbre
Timbre is just a fancy word describing the sound of a sound. If you play
the same note with different instruments such as a violin, guitar, or
piano, the pitch (how high or low it sounds) would be the same, but the
sound quality would be different. That sound quality - the thing which
allows you to tell the difference between a piano and a guitar is the
timbre.
Melodic Composition
Another important aspect to our lead synth is the choice of notes we
want to play. If you already have a good idea, then you can simply
create a ring with your notes in and tick through them:
Melodic Composition
live_loop :riffdo
use_synth :prophet
riff = (ring :e3, :e3, :r, :g3, :r, :r, :r, :a3)
play riff.tick, release:0.5, cutoff:80
sleep 0.25
end
Here, we’ve defined our melody with a ring which includes both notes
such as :e3 and rests represented by :r. We’re then using .tick to
cycle through each note to give us a repeating riff.
Auto Melody
It’s not always easy to come up with a nice riff from scratch. Instead
it’s often easier to ask Sonic Pi for a selection of random riffs and to
choose the one you like the best. To do that we need to combine three
things: rings, randomisation and random seeds. Let’s look at an example:
Auto Melody
live_loop :random_riffdo
use_synth :dsaw
use_random_seed 3
notes = (scale :e3, :minor_pentatonic).shuffle
play notes.tick, release:0.25, cutoff:80
sleep 0.25
end
There’s a few things going on - let’s look at them in turn. First, we
specify that we’re using random seed 3. What does this mean? Well, the
useful thing is that when we set the seed, we can predict what the next
random value is going to be - it’s the same as it was last time we set
the seed to 3! Another useful thing to know is that shuffling a ring of
notes works in the same way. In the example above we’re essentially
asking for the ‘third shuffle’ in the standard list of shuffles - which
is also the same every time as we’re always setting the random seed to
the same value right before the shuffle. Finally we’re just ticking
through our shuffled notes to play the riff.
Now, here’s where the fun starts. If we change the random seed value to
another number, say 3000, we get an entirely different shuffling of the
notes. So now it’s extremely easy to explore new melodies. Simply choose
the list of notes we want to shuffle (scales are a great starting point)
and then choose the seed we want to shuffle with. If we don’t like the
melody, just change one of those two things and try again. Repeat until
you like what you hear!
Pseudo Randomisation
Sonic Pi’s randomisation is not actually random it’s what’s called
pseudo random. Imagine if you were to roll a dice 100 times and write
down the result of each roll onto a piece of paper. Sonic Pi has the
equivalent of this list of results which it uses when you ask for a
random value. Instead of rolling an actual dice, it just picks the next
value from the list. Setting the random seed is just jumping to a
specific point in that list.
Finding your Rhythm
Another important aspect to our riff is the rhythm - when to play a note
and when not to. As we saw above we can use :r in our rings to insert
rests. Another very powerful way is to use spreads which we’ll cover in
a future tutorial. Today we’ll use randomisation to help us find our
rhythm. Instead of playing every note we can use a conditional to play a
note with a given probability. Let’s take a look:
Finding your Rhythm
live_loop :random_riffdo
use_synth :dsaw
use_random_seed 30
notes = (scale :e3, :minor_pentatonic).shuffle
16.times do
play notes.tick, release:0.2, cutoff:90if one_in(2)
sleep 0.125
end
end
A really useful fn to know is one_in which will give us a
true or false value with the specified probability. Here, we’re
using a value of 2 so on average one time every two calls to one_in it
will return true. In other words, 50% of the time it will return
true. Using higher values will make it return false more often
introducing more space into the riff.
Notice that we’ve added some iteration in here with 16.times. This is
because we only want to reset our random seed value every 16 notes so
our rhythm repeats every 16 times. This doesn’t affect the shuffling as
that is still done immediately after the seed is set. We can use the
iteration size to alter the length of the riff. Try changing the 16 to 8
or even 4 or 3 and see how it affects the rhythm of the riff.
Bringing it all together
OK, so let’s combine everything we’ve learned together into one final
example. See you next time!
play notes.tick, release: rand(0.5), cutoff: rrand(60, 130) if one_in(2)
sleep 0.125
end
end
live_loop :drumsdo
use_random_seed 500
16.times do
sample :bd_haus, rate:2, cutoff:110if rand < 0.35
sleep 0.125
end
end
live_loop :bddo
sample :bd_haus, cutoff:100, amp:3
sleep 0.5
end
A.5 Acid Bass
It’s impossible to look through the history of electronic dance music
without seeing the enormous impact of the tiny Roland TB-303
synthesiser. It’s the secret sauce behind the original acid bass
sound. Those classic squealing and squelching TB-303 bass riffs can be
heard from the early Chicago House scene through to more recent
electronic artists such as Plastikman, Squarepusher and Aphex Twin.
Interestingly, Roland never intended for the TB-303 to be used in dance
music. It was originally created as a practice aid for guitarists. They
imagined that people would program them to play bass lines to jam along
to. Unfortunately there were a number of problems: they were a little
fiddly to program, didn’t sound particularly good as a bass-guitar
replacement and were pretty expensive to buy. Deciding to cut their
losses, Roland stopped making them after 10,000 units were sold and
after a number of years sitting on guitarist’s shelves, they soon could
be found in the windows of second hand shops. These lonely discarded
TB-303s were waiting to be discovered by a new generation of
experimenters who started using them in ways that Roland didn’t imagine
to create wild new sounds. Acid House was born.
Although getting your hands on an original TB-303 is not so easy you
will be pleased to know that you can turn your Raspberry Pi into one
using the power of Sonic Pi. Behold, fire up Sonic Pi and throw this
code into an empty buffer and hit Run:
Acid Bass
use_synth :tb303
play :e1
Instant acid bass! Let’s play around…
Squelch that Bass
First, let’s build a live arpeggiator to make things fun. In the last
tutorial we looked at how riffs can just be a ring of notes that we tick
through one after another, repeating when we get to the end. Let’s
create a live loop that does exactly that:
Squelch that Bass
use_synth :tb303
live_loop :squelchdo
n = (ring :e1, :e2, :e3).tick
play n, release:0.125, cutoff:100, res:0.8, wave:0
sleep 0.125
end
Take a look at each line.
On the first line we set the default synth to be tb303 with the
use_synth fn.
On line two we create a live loop called :squelch which will just
loop round and round.
Line three is where we create our riff - a ring of notes (E in
octaves 1, 2, and 3) which we simply tick through with .tick. We
define n to represent the current note in the riff. The equals sign
just means to assign the value on the right to the name on the
left. This will be different every time round the loop. The first
time round, n will be set to :e1. The second time round it will
be :e2, followed by :e3, and then back to :e1, cycling round
forever.
Line four is where we actually trigger our :tb303 synth. We’re
passing a few interesting opts here: release:, cutoff:, res:
and wave: which we’ll discuss below.
Line five is our sleep - we’re asking the live loop to loop round
every 0.125s or 8 times a second at the default BPM of 60.
Line six is the end to the live loop. This just tells Sonic Pi
where the end of the live loop is.
Whilst you’re still figuring out what’s going on, type in the code above
and hit the Run button. You should hear the :tb303 kick into
action. Now, this is where the action is: let’s start live coding.
Whilst the loop is still live, change the cutoff: opt to 110. Now
hit the Run button again. You should hear the sound become a little
harsher and more squelchy. Dial in 120 and hit run. Now 130. Listen
how higher cutoff values make it sound more piercing and
intense. Finally, drop it down to 80 when you feel like a rest. Then
repeat as many times as you want. Don’t worry, I’ll still be here…
Another opt worth playing with is res:. This controls the level of
resonance of the filter. A high resonance is characteristic of acid bass
sounds. We currently have our res: set to 0.8. Try cranking it up to
0.85, then 0.9, and finally 0.95. You might find that a cutoff
such as 110 or higher will make the differences easier to
hear. Finally go wild and dial in 0.999 for some insane sounds. At a
res this high, you’re hearing the cutoff filter resonate so much it
starts to make sounds of its own!
Finally, for a big impact on the timbre try changing the wave: opt to
1. This is the choice of source oscillator. The default is 0 which
is a sawtooth wave. 1 is a pulse wave and 2 is a triangle wave.
Of course, try different riffs by changing the notes in the ring or even
picking notes from scales or chords. Have fun with your first acid bass
synth.
Deconstructing the TB-303
The design of the original TB-303 is actually pretty simple. As you can
see from the following diagram there’s only 4 core parts.
First is the oscillator wave - the raw ingredients of the sound. In this
case we have a square wave. Next there’s the oscillator’s amplitude
envelope which controls the amp of the square wave through time. These
are accessed in Sonic Pi by the attack:, decay:, sustain: and
release: opts along with their level counterparts. For more
information read Section 2.4 ‘Duration with Envelopes’ in the built-in
tutorial. We then pass our enveloped square wave through a resonant low
pass filter. This chops off the higher frequencies as well as having
that nice resonance effect. Now this is where the fun starts. The cutoff
value of this filter is also controlled by its own envelope! This means
we have amazing control over the timbre of the sound by playing with
both of these envelopes. Let’s take a look:
Deconstructing the TB-303
use_synth :tb303
with_fx :reverb, room:1do
live_loop :space_scannerdo
play :e1, cutoff:100, release:7, attack:1, cutoff_attack:4, cutoff_release:4
sleep 8
end
end
For each standard envelope opt, there’s a cutoff_ equivalent opt in
the :tb303 synth. So, to change the cutoff attack time we can use the
cutoff_attack: opt. Copy the code above into an empty buffer and hit
Run. You’ll hear a strange sound warble in and out. Now start to play. Try
changing the cutoff_attack: time to 1 and then 0.5. Now try 8.
Notice that I’ve passed everything through a :reverb FX for extra
atmosphere - try other FX to see what works!
Bringing it all together
Finally, here’s a piece I composed using the ideas in this
tutorial. Copy it into an empty buffer, listen for a while and then
start live coding your own changes. See what wild sounds you can make
with it! See you next time…
Bringing it all together · 4
use_synth :tb303
use_debug false
with_fx :reverb, room:0.8do
live_loop :space_scannerdo
with_fx :slicer, phase:0.25, amp:1.5do
co = (line 70, 130, steps:8).tick
play :e1, cutoff: co, release:7, attack:1, cutoff_attack:4, cutoff_release:4
sleep 8
end
end
live_loop :squelchdo
use_random_seed 3000
16.times do
n = (ring :e1, :e2, :e3).tick
play n, release:0.125, cutoff: rrand(70, 130), res:0.9, wave:1, amp:0.8
sleep 0.125
end
end
end
A.6 Musical Minecraft
Deprecation WarningApologies but this article was written back when Minecraft Pi Edition
was still part of Raspberry Pi OS and Sonic Pi had built-in support to
control it with code. Unfortunately this is no longer the case and the
minecraft specific code (mc_* functions) are no longer available in
Sonic Pi. However, this article is left here as a memory of what was
once possible.
Hello and welcome back! In the previous tutorials we’ve focussed purely
on the music possibilities of Sonic Pi - (turning your Raspberry Pi into
a performance ready musical instrument). So far we’ve learned how to:
Live Code - changing the sounds on-the-fly,
Code some huge beats,
Generate powerful synth leads,
Re-create the famous TB-303 acid-bass sound.
There’s so much more to show you (which we will explore in future
editions). However, this month, let’s look at something Sonic Pi can do
that you probably didn’t realise: control Minecraft.
Hello Minecraft World
OK, let’s get started. Boot up your Raspberry Pi, fire up Minecraft Pi
and create a new world. Now start up Sonic Pi and re-size and move your
windows so you can see both Sonic Pi and Minecraft Pi at the same time.
In a fresh buffer type the following:
Hello Minecraft World
mc_message "Hello Minecraft from Sonic Pi!"
Now, hit Run. Boom! Your message appeared in Minecraft! How easy was
that? Now, stop reading this for a moment and play about with your own
messages. Have fun!
Sonic Teleporter
Now let’s do some exploring. The standard option is to reach for the
mouse and keyboard and start walking around. That works, but it’s pretty
slow and boring. It would be far better if we had some sort of teleport
machine. Well, thanks to Sonic Pi, we have one. Try this:
Sonic Teleporter
mc_teleport 80, 40, 100
Crikey! That was a long way up. If you weren’t in flying-mode then you
would have fallen back down all the way to the ground. If you double-tap
space to enter flying-mode and teleport again, you’ll stay hovering at
the location you zap to.
Now, what do those numbers mean? We have three numbers which describe
the coordinates of where in the world we want to go. We give each number
a name - x, y and z:
x - how far left and right (80 in our example)
y - how high we want to be (40 in our example)
z - how far forward and back (100 in our example)
By choosing different values for x, y and z we can teleport anywhere
in our world. Try it! Choose different numbers and see where you can end
up. If the screen goes black it’s because you’ve teleported yourself
under the ground or into a mountain. Just choose a higher y value to get
back out above land. Keep on exploring until you find somewhere you
like…
Using the ideas so far, let’s build a Sonic Teleporter which makes a fun
teleport sound whilst it whizzes us across the Minecraft world:
Sonic Teleporter · 2
mc_message "Preparing to teleport...."
sample :ambi_lunar_land, rate: -1
sleep 1
mc_message "3"
sleep 1
mc_message "2"
sleep 1
mc_message "1"
sleep 1
mc_teleport 90, 20, 10
mc_message "Whoooosh!"
Magic Blocks
Now you’ve found a nice spot, let’s start building. You could do what
you’re used to and start clicking the mouse furiously to place blocks
under the cursor. Or you could use the magic of Sonic Pi. Try this:
Magic Blocks
x, y, z = mc_location
mc_set_block :melon, x, y + 5, z
Now look up! There’s a melon in the sky! Take a moment to look at the
code. What did we do? On line one we grabbed the current location of
Steve as the variables x, y and z. These correspond to our coordinates
described above. We use these coordinates in the fn mc_set_block which
will place the block of your choosing at the specified coordinates. In
order to make something higher up in the sky we just need to increase
the y value which is why we add 5 to it. Let’s make a long trail of them:
Magic Blocks · 2
live_loop :melon_traildo
x, y, z = mc_location
mc_set_block :melon, x, y-1, z
sleep 0.125
end
Now, jump over to Minecraft, make sure you’re in flying-mode (double tap
space if not) and fly all around the world. Look behind you to see a
pretty trail of melon blocks! See what kind of twisty patterns you can
make in the sky.
Live Coding Minecraft
Those of you that have been following this tutorial over the last few
months will probably have your minds blown at this point. The trail of
melons is pretty cool, but the most exciting part of the previous
example is that you can use live_loop with Minecraft! For those that
don’t know, live_loop is Sonic Pi’s special magic ability that no
other programming language has. It lets you run multiple loops at the
same time and allows you to change them whilst they run. They are
incredibly powerful and amazing fun. I use live_loops to perform music
in nightclubs with Sonic Pi - DJs use discs and I use live_loops :-)
However, today we’re going to live code both music and Minecraft.
Let’s get started. Run the code above and start making your melon
trail again. Now, without stopping the code, just simply change :melon to
:brick and hit run. Hey presto, you’re now making a brick trail. How
simple was that! Fancy some music to go with it? Easy. Try this:
Live Coding Minecraft
live_loop :bass_traildo
tick
x, y, z = mc_location
b = (ring :melon, :brick, :glass).look
mc_set_block b, x, y -1, z
note = (ring :e1, :e2, :e3).look
use_synth :tb303
play note, release:0.1, cutoff:70
sleep 0.125
end
Now, whilst that’s playing start changing the code. Change the block
types - try :water, :grass or your favourite block type. Also, try
changing the cutoff value from 70 to 80 and then up to 100. Isn’t
this fun?
Bringing it all together
Let’s combine everything we’ve seen so far with a little extra
magic. Let’s combine our teleportation ability with block placing and
music to make a Minecraft Music Video. Don’t worry if you don’t
understand it all, just type it in and have a play by changing some of
the values whilst it’s running live. Have fun and see you next time…
Bringing it all together · 5
live_loop :note_blocksdo
mc_message "This is Sonic Minecraft"
with_fx :reverbdo
with_fx :echo, phase:0.125, reps:32do
tick
x = (range 30, 90, step:0.1).look
y = 20
z = -10
mc_teleport x, y, z
ns = (scale :e3, :minor_pentatonic)
n = ns.shuffle.choose
bs = (knit :glass, 3, :sand, 1)
b = bs.look
synth :beep, note: n, release:0.1
mc_set_block b, x+20, n-60+y, z+10
mc_set_block b, x+20, n-60+y, z-10
sleep 0.25
end
end
end
live_loop :beatsdo
sample :bd_haus, cutoff:100
sleep 0.5
end
A.7 Bizet Beats
After our brief excursion to the fantastic world of coding Minecraft
with Sonic Pi last month, let’s get musical again. Today we’re going to
bring a classical operatic dance piece straight into the 21st century
using the awesome power of code.
Outrageous and Disruptive
Let’s jump into a time machine back to the year 1875. A composer called
Bizet had just finished his latest opera Carmen. Unfortunately like
many exciting and disruptive new pieces of music people initially
didn’t like it at all because it was too outrageous and different. Sadly
Bizet died ten years before the opera gained huge international success
and became one of the most famous and frequently performed operas
of all time. In sympathy with this tragedy let’s take one of the main
themes from Carmen and convert it to a modern format of music that is
also too outrageous and different for most people in our time - live
coded music!
Decoding the Habanera
Trying to live code the whole opera would be a bit of a challenge for
this tutorial, so let’s focus on one of the most famous parts - the bass
line to the Habanera:
This may look extremely unreadable to you if you haven’t yet studied
music notation. However, as programmers we see music notation as just
another form of code - only it represents instructions to a musician instead
of a computer. We therefore need to figure out a way of decoding it.
Notes
The notes are arranged from left to right like the words in this
magazine but also have different heights. The height on the score
represents the pitch of the note. The higher the note on the score, the
higher the pitch of the note.
In Sonic Pi we already know how to change the pitch of a note - we
either use high or low numbers such as play 75 and play 80 or we use
the note names: play :E and play :F. Luckily each of the vertical
positions of the musical score represents a specific note name. Take a
look at this handy look up table:
Rests
Music scores are an extremely rich and expressive kind of code capable
of communicating many things. It therefore shouldn’t come as much of a
surprise that musical scores can not only tell you what notes to play but
also when not to play notes. In programming this is pretty much
equivalent to the idea of nil or null - the absence of a value. In
other words not playing a note is like the absence of a note.
If you look closely at the score you’ll see that it’s actually a
combination of black dots with lines which represent notes to play and
squiggly things which represent the rests. Luckily Sonic Pi has a very
handy representation for a rest: :r, so if we run: play :r it
actually plays silence! We could also write play :rest, play nil or
play false which are all equivalent ways of representing rests.
Rhythm
Finally, there’s one last thing to learn how to decode in the notation -
the timings of the notes. In the original notation you’ll see that the
notes are connected with thick lines called beams. The second note has
two of these beams which means it lasts for a 16th of a beat. The other
notes have a single beam which means they last for an 8th of a beat. The
rest has two squiggly beams which means it also represents a 16th of the
beat.
When we attempt to decode and explore new things a very handy trick is
to make everything as similar as possible to try and see any
relationships or patterns. For example, when we re-write our notation
purely in 16ths you can see that our notation just turns into a nice
sequence of notes and rests.
Re-coding the Habanera
We’re now in a position to start translating this bass line to Sonic
Pi. Let’s encode these notes and rests in a ring:
Re-coding the Habanera
(ring :d, :r, :r, :a, :f5, :r, :a, :r)
Let’s see what this sounds like. Throw it in a live loop and tick
through it:
Re-coding the Habanera · 2
live_loop :habanerado
play (ring :d, :r, :r, :a, :f5, :r, :a, :r).tick
sleep 0.25
end
Fabulous, that instantly recognisable riff springs to life through your
speakers. It took a lot of effort to get here, but it was worth it -
high five!
Moody Synths
Now we have the bass line, let’s re-create some of the ambience of the
operatic scene. One synth to try out is :blade which is a moody 80s
style synth lead. Let’s try it with the starting note :d passed
through a slicer and reverb:
Now, try the other notes in the bass line: :a and :f5. Remember, you
don’t need to hit stop, just modify the code whilst the music is playing
and hit run again. Also, try different values for the slicer’s phase:
opt such as 0.5, 0.75 and 1.
Bringing it all together
Finally, let’s combine all the ideas so far into a new remix of the
Habanera. You might notice that I’ve included another part of the bass
line as a comment. Once you’ve typed it all into a fresh buffer hit Run
to hear the composition. Now, without hitting stop, uncomment the
second line by removing the # and hit run again - how marvellous is
that! Now, start mashing it around yourself and have fun.
Deprecation WarningApologies but this article was written back when Minecraft Pi Edition
was still part of Raspberry Pi OS and Sonic Pi had built-in support to
control it with code. Unfortunately this is no longer the case and the
minecraft specific code (mc_* functions) are no longer available in
Sonic Pi. However, this article is left here as a memory of what was
once possible.
Everyone has played Minecraft. You will all have built amazing
structures, designed cunning traps and even created elaborate cart lines
controlled by redstone switches. How many of you have performed with
Minecraft? We bet you didn’t know that you could use Minecraft to create
amazing visuals just like a professional VJ.
If your only way of modifying Minecraft was with the mouse, you’d have a
tough time changing things fast enough. Luckily for you your Raspberry
Pi comes with a version of Minecraft that can be controlled with
code. It also comes with an app called Sonic Pi which makes coding
Minecraft not only easy but also incredibly fun.
In today’s article we’ll be showing you some of the tips and tricks that
we’ve used to create performances in night clubs and music venues around
the world.
Let’s get started…
Getting Started
Let’s start with a simple warm up exercise to refresh ourselves with the
basics. First up, crack open your Raspberry Pi and then fire up both
Minecraft and Sonic Pi. In Minecraft, create a new world, and in Sonic
Pi choose a fresh buffer and write in this code:
Getting Started
mc_message "Let's get started..."
Hit the Run button and you’ll see the message over in the Minecraft
window. OK, we’re ready to start, let’s have some fun……
Sand Storms
When we’re using Minecraft to create visuals we try and think about what
will both look interesting and also be easy to generate from code. One
nice trick is to create a sand storm by dropping sand blocks from the
sky. For that all we need are a few basic fns:
sleep - for inserting a delay between actions
mc_location - to find our current location
mc_set_block- to place sand blocks at a specific location
rrand - to allow us to generate random values within a range
live_loop - to allow us to continually make it rain sand
If you’re unfamiliar with any of the built-in fns such as rrand, just
type the word into your buffer, click on it and then hit the keyboard
combo Control-i to bring up the built-in documentation. Alternatively
you can navigate to the lang tab in the Help system and then look up
the fns directly along with all the other exciting things you can do.
Let’s make it rain a little first before unleashing the full power of
the storm. Grab your current location and use it to create a few sand
blocks up in the sky nearby:
Sand Storms
x, y, z = mc_location
mc_set_block :sand, x, y + 20, z + 5
sleep 2
mc_set_block :sand, x, y + 20, z + 6
sleep 2
mc_set_block :sand, x, y + 20, z + 7
sleep 2
mc_set_block :sand, x, y + 20, z + 8
When you hit Run, you might have to look around a little as the blocks
may start falling down behind you depending on which direction you’re
currently facing. Don’t worry, if you missed them just hit Run again for
another batch of sand rain - just make sure you’re looking the right
way!
Let’s quickly review what’s going on here. On the first line we grabbed
Steve’s location as coordinates with the fn mc_location and placed
them into the vars x, y, and z. Then on the next lines we used the
mc_set_block fn to place some sand at the same coordinates as Steve
but with some modifications. We chose the same x coordinate, a y
coordinate 20 blocks higher and then successively larger z coordinates
so the sand dropped in a line away from Steve.
Why don’t you take that code and start playing around with it yourself?
Try adding more lines, changing the sleep times, try mixing :sand with
:gravel and choose different coordinates. Just experiment and have fun!
Live Loops Unleashed
OK, it’s time to get the storm raging by unleashing the full power of
the live_loop - Sonic Pi’s magical ability which unleashes the full
power of live coding - changing code on-the-fly whilst it’s running!
Live Loops Unleashed
live_loop :sand_stormdo
x, y, z = mc_location
xd = rrand(-10, 10)
zd = rrand(-10, 10)
co = rrand(70, 130)
synth :cnoise, attack:0, release:0.125, cutoff: co
mc_set_block :sand, x + xd, y+20, z+zd
sleep 0.125
end
What fun! We’re looping round pretty quickly (8 times a second) and
during each loop we’re finding Steve’s location like before but then
generating 3 random values:
xd - the difference for x which will be between -10 and 10
zd - the difference for z also between -10 and 10
co - a cutoff value for the low pass filter between 70 and 130
We then use those random values in the fns synth and mc_set_block
giving us sand falling in random locations around Steve along with a
percussive rain-like sound from the :cnoise synth.
For those of you new to live loops - this is where the fun really starts
with Sonic Pi. Whilst the code is running and the sand is pouring down,
try changing one of the values, perhaps the sleep time to 0.25 or the
:sand block type to :gravel. Now hit run again. Hey Presto! Things
changed without the code stopping. This is your gateway to performing
like a real VJ. Keep practising and changing things around. How
different can you make the visuals without stopping the code?
Epic Block Patterns
Finally, another great way of generating interesting visuals is to
generate huge patterned walls to fly towards and close by. For this
effect we’ll need to move from placing the blocks randomly to placing
them in an ordered manner. We can do this by nesting two sets of
iteration (hit the Help button and navigate to section 5.2 of the
tutorial “Iteration and Loops” for more background on iteration). The
funny |xd| after the do means that xd will be set for each value of
the iteration. So the first time it will be 0, then 1, then 2… etc. By
nesting two lots of iteration together like this we can generate all the
coordinates for a square. We can then randomly choose block types from a
ring of blocks for an interesting effect:
Epic Block Patterns
x, y, z = mc_location
bs = (ring :gold, :diamond, :glass)
10.times do |xd|
10.times do |yd|
mc_set_block bs.choose, x + xd, y + yd, z
end
end
Pretty neat. Whilst we’re having fun here, try changing bs.choose to
bs.tick to move from a random pattern to a more regular one. Try
changing the block types and the more adventurous of you might want to
try sticking this within a live_loop so that the patterns keep changing
automatically.
Now, for the VJ finale - change the two 10.times to 100.times and
hit Run. Kaboom! A Huge gigantic wall of randomly placed bricks. Imagine
how long it would take you to build that manually with your mouse!
Double-tap space to enter fly-mode and start swooping by for some great
visual effects. Don’t stop here though - use your imagination to conjure
up some cool ideas and then use the coding power of Sonic Pi to make it
real. When you’ve practised enough dim the lights and put on a VJ show
for your friends!
A.9 Randomisation
Back in episode 4 of this tutorial series we took a brief look at
randomisation whilst coding up some sizzling synth riffs. Given that
randomisation is such an important part of my live coding DJ sets I
thought it would be useful to cover the fundamentals in much greater
detail. So, get your lucky hat on and let’s surf some random streams!
There is no random
The first thing to learn which might really surprise you when playing
with Sonic Pi’s randomisation functions is that they’re not actually
really random. What does this actually mean? Well, let’s try a couple of
tests. First, imagine a number in your head between 0 and 1. Keep it
there and don’t tell me. Now let me guess… was it 0.321567? No? Bah,
I’m clearly no good at this. Let me have another go, but let’s ask Sonic
Pi to choose a number this time. Fire up Sonic Pi v2.7+ and ask it for a
random number but again don’t tell me:
There is no random
print rand
Now for the reveal… was it 0.75006103515625? Yes! Ha, I can see
you’re a little sceptical. Perhaps it was just a lucky guess. Let’s try
again. Press the Run button again and see what we get… What?
0.75006103515625 again? This clearly can’t be random! You’re right,
it’s not.
What’s going on here? The fancy computer science word here is
determinism. This just means that nothing is by chance and everything is
destined to be. Your version of Sonic Pi is destined to always return
0.75006103515625 in the program above. This might sound pretty
useless, but let me assure you that it’s one of the most powerful parts
of Sonic Pi. If you stick at it you’ll learn how to rely on the
deterministic nature of Sonic Pi’s randomisation as a fundamental
building block for your compositions and live coded DJ sets.
A Random Melody
When Sonic Pi boots it actually loads into memory a sequence of 441,000
pre-generated random values. When you call a random function such as
rand or rrand, this random stream is used to generate your
result. Each call to a random function consumes a value from this
stream. Therefore the 10th call to a random function will use the 10th
value from the stream. Also, every time you press the Run button, the
stream is reset for that run. This is why I could predict the result to
rand and why the ‘random’ melody was the same every time. Everybody’s
version of Sonic Pi uses the exact same random stream which is very
important when we start sharing our pieces with each other.
Let’s use this knowledge to generate a repeatable random melody:
A Random Melody
8.times do
play rrand_i(50, 95)
sleep 0.125
end
Type this into a spare buffer and hit Run. You’ll hear a melody
consisting of ‘random’ notes between 50 and 95. When it’s finished, hit
Run again to hear exactly the same melody again.
Handy Randomisation Functions
Sonic Pi comes with a number of useful functions for working with the
random stream. Here’s a list of some of the most useful:
rand - Simply returns the next value in the random stream
rrand - Returns a random value within a range
rrand_i - Returns a random whole number within a range
one_in - Returns true or false with the given probability
dice - Imitates rolling a dice and returns a value between 1 and 6
choose - Chooses a random value from a list
Check out their documentation in the Help system for detailed
information and examples.
Resetting the Stream
Whilst the ability to repeat a sequence of chosen notes is essential to
allow you to replay a riff on the dance floor, it might not be exactly
the riff you want. Wouldn’t it be great if we could try a number of
different riffs and choose the one we liked best? This is where the real
magic starts.
We can manually set the stream with the fn use_random_seed. In
Computer Science, a random seed is the starting point from which a new
stream of random values can sprout out and blossom. Let’s try it:
Resetting the Stream
use_random_seed 0
3.times do
play rrand_i(50, 95)
sleep 0.125
end
Great, we get the first three notes of our random melody above: 84,
83 and 71. However, we can now change the seed to something
else. How about this:
Resetting the Stream · 2
use_random_seed 1
3.times do
play rrand_i(50, 95)
sleep 0.125
end
Interesting, we get 83, 71 and 61 . You might notice that the
first two numbers here are the same as the last two numbers before -
this isn’t a coincidence.
Remember that the random stream is just a giant list of ‘pre-rolled’
values. Using a random seed simply jumps us to a point in that
list. Another way of thinking about it is to imagine a huge deck of
pre-shuffled cards. Using a random seed is cutting the deck at a
particular point. The fabulous part of this is that it’s precisely this
ability to jump around the random stream which gives us huge power when making
music.
Let’s revisit our random melody of 8 notes with this new stream
resetting power, but let’s also throw in a live loop so we can
experiment live whilst it’s playing:
Resetting the Stream · 3
live_loop :random_riffdo
use_random_seed 0
8.times do
play rrand_i(50, 95), release:0.1
sleep 0.125
end
end
Now, whilst it’s still playing, change the seed value from 0 to
something else. Try 100, what about 999. Try your own values,
experiment and play around - see which seed generates the riff you like
best.
Bringing it all together
This month’s tutorial has been quite a technical dive into the workings
of Sonic Pi’s randomisation functionality. Hopefully it has given you
some insight into how it works and how you can start using randomisation
in a reliable way to create repeatable patterns within your music. It’s
important to stress that you can use repeatable randomisation anywhere
you want. For example, you can randomise the amplitude of notes, the
timing of the rhythm, the amount of reverb, the current synth, the mix
of an FX, etc. etc. In the future we’ll take a close look at some of
these applications, but for now let me leave you with a short example.
Type the following into a spare buffer, hit Run, and then start changing
the seeds around, hit Run again (whilst it’s still playing) and explore
the different sounds, rhythms and melodies you can make. When you find a
nice one, remember the seed number so you can get back to it. Finally,
when you’ve found a few seeds you like, put on a live coded performance
for your friends by simply switching between your favourite seeds to
create a full piece.
Bringing it all together · 7
live_loop :random_riffdo
use_random_seed 10300
use_synth :prophet
s = [0.125, 0.25, 0.5].choose
8.times do
r = [0.125, 0.25, 1, 2].choose
n = (scale :e3, :minor).choose
co = rrand(30, 100)
play n, release: r, cutoff: co
sleep s
end
end
live_loop :drumsdo
use_random_seed 2001
16.times do
r = rrand(0.5, 10)
sample :drum_bass_hard, rate: r, amp: rand
sleep 0.125
end
end
A.10 Control
So far during this series we’ve focussed on triggering sounds. We’ve
discovered that we can trigger the many synths built into Sonic Pi with
play or synth and how to trigger pre-recorded samples with
sample. We’ve also looked at how we can wrap these triggered sounds
within studio FX such as reverb and distortion using the with_fx
command. Combine this with Sonic Pi’s incredibly accurate timing system
and you can produce a vast array of sounds, beats and riffs. However,
once you’ve carefully selected a particular sound’s options and
triggered it, there’s no ability to mess with it whilst it’s playing
right? Wrong! Today you’re going to learn something very powerful - how
to control running synths.
A Basic Sound
Let’s create a nice simple sound. Fire up Sonic Pi and in a fresh buffer
type the following:
A Basic Sound
synth :prophet, note::e1, release:8, cutoff:100
Now press the Run button at the top left to hear a lovely rumbling synth
sound. Go ahead, press it again a few times to get a feel for it. OK,
done? Let’s start controlling it!
Synth Nodes
A little known feature in Sonic Pi is that the fns play, synth and
sample, return something called a SynthNode which represents a
running sound. You can capture one of these SynthNodes using a
standard variable and then control it at a later point in time. For
example, let’s change the value of the cutoff: opt after 1 beat:
Synth Nodes
sn = synth :prophet, note::e1, release:8, cutoff:100
sleep 1
control sn, cutoff:130
Let’s look at each line in turn:
Firstly we trigger the :prophet synth using the synth fn as
normal. However we also capture the result in a variable called sn. We
could have called this variable something completely different such as
synth_node or jane - the name doesn’t matter. However, it’s
important to choose a name that’s meaningful to you for your
performances and for people reading your code. I chose sn as it’s a nice
short mnemonic for synth node.
On line 2 we have a standard sleep command. This does nothing special
- it just asks the computer to wait for 1 beat before moving onto the
next line.
Line 3 is where the control fun starts. Here, we use the control fn to
tell our running SynthNode to change the cutoff value to 130. If you
hit the Run button, you’ll hear the :prophet synth start playing
as before, but after 1 beat it will shift to sound a lot brighter.
Modulatable Options
Most of Sonic Pi’s synths and FX opts may be changed after being
triggered. However, this isn’t the case for all of them. For example,
the envelope opts attack:, decay:, sustain: and release: can
only be set when triggering the synth. Figuring out which opts can and
can’t be changed is simple - just head to the documentation for a given
synth or FX and then scroll down to the individual option documentation
and look for the phrases “May be changed whilst playing” or “Can not be
changed once set”. For example, the documentation for the :beep
synth’s attack: opt makes it clear that it’s not possible to change
it:
Default: 0
Must be zero or greater
Can not be changed once set
Scaled with current BPM value
Multiple Changes
Whilst a synth is running you’re not limited to changing it only once -
you’re free to change it as many times as you like. For example, we can
turn our :prophet into a mini arpeggiator with the following:
Multiple Changes
notes = (scale :e3, :minor_pentatonic)
sn = synth :prophet, note::e1, release:8, cutoff:100
sleep 1
16.times do
control sn, note: notes.tick
sleep 0.125
end
In this snippet of code we just added a couple of extra things. First we
defined a new variable called notes which contains the notes we’d like
to cycle through (an arpeggiator is just a fancy name for something that
cycles through a list of notes in order). Secondly we replaced our
single call to control with an iteration calling it 16 times. In each
call to control we .tick through our ring of notes which will
automatically repeat once we get to the end (thanks to the fabulous power
of Sonic Pi’s rings). For a bit of variety try replacing .tick with
.choose and see if you can hear the difference.
Note that we can change multiple opts simultaneously. Try changing the
control line to the following and listen for the difference:
Multiple Changes · 2
control sn, note: notes.tick, cutoff: rrand(70, 130)
Sliding
When we control a SynthNode, it responds exactly on time and instantly
changes the value of the opt to the new one as if you’d pressed a button
or flicked a switch requesting the change. This can sound rhythmical and percussive -
especially if the opt controls an aspect of the timbre such as
cutoff:. However, sometimes you don’t want the change to happen
instantaneously. Instead, you might want to smoothly move from the
current value to the new one as if you’d moved a slider or dial. Of
course, Sonic Pi can also do this too using the _slide: opts.
Each opt that can be modified also has a special corresponding _slide:
opt that allows you to specify a slide time. For example, amp: has
amp_slide: and cutoff: has cutoff_slide:. These slide opts work
slightly differently than all the other opts in that they tell the synth
note how to behave next time they are controlled. Let’s take a look:
Sliding
sn = synth :prophet, note::e1, release:8, cutoff:70, cutoff_slide:2
sleep 1
control sn, cutoff:130
Notice how this example is exactly the same as before except with the
addition of cutoff_slide:. This is saying that next time this synth
has its cutoff: opt controlled, it will take 2 beats to slide from the
current value to the new one. Therefore, when we use control you can
hear the cutoff slide from 70 to 130. It creates an interesting dynamic
feel to the sound. Now, try changing the cutoff_slide: time to a
shorter value such as 0.5 or a longer value such as 4 to see how it
changes the sound. Remember, you can slide any of the modifiable opts in
exactly this way and each _slide: value can be totally different so
you can have the cutoff sliding slowly, the amp sliding fast and the pan
sliding somewhere in between if that’s what you’re looking to create…
Bringing it all together
Let’s look at a short example which demonstrates the power of
controlling synths after they’ve been triggered. Notice that you can
also slide FX just like synths although with a slightly different
syntax. Check out section 7.2 of the built-in tutorial for more
information on controlling FX.
Copy the code into a spare buffer and take a listen. Don’t stop there
though - play around with the code. Change the slide times, change the
notes, the synth, the FX and the sleep times and see if you can turn it
into something completely different!
sn = synth :prophet , sustain:8, note::e1, cutoff:70, cutoff_slide:8
control sn, cutoff:130
sleep 2
32.times do
control sn, note: notes.tick, pan: rrand(-1, 1)
sleep 0.125
end
end
end
A.11 Tick Tock
Last month in this series we took a deep technical dive into the
randomisation system underpinning Sonic Pi. We explored how we can use
it to deterministically add new levels of dynamic control over our
code. This month we’re going to continue our technical dive and turn our
attention to Sonic Pi’s unique tick system. By the end of this article
you’ll be ticking your way through rhythms and riffs on your way to
being a live coding DJ.
Beat Counting
When making music we often want to do a different thing depending on
which beat it is. Sonic Pi has a special beat counting system called
tick to give you precise control over when a beat actually occurs and
even supports multiple beats with their own tempos.
Let’s have a play - to advance the beat we just need to call
tick. Open up a fresh buffer, type in the following and hit Run:
Beat Counting
puts tick #=> 0
This will return the current beat: 0. Notice that even if you press
the Run button a few times it will always return 0. This is because
each run starts a fresh beat counting from 0. However, whilst the run
is still active, we can advance the beat as many times as we want:
Beat Counting · 2
puts tick #=> 0
puts tick #=> 1
puts tick #=> 2
Whenever you see the symbol #=> at the end of a line of
code it means that that line will log the text on the
right-hand-side. For example, puts foo #=> 0 means the code puts foo
prints 0 to the log at that point in the program.
Checking the Beat
We’ve seen that tick does two things. It increments (adds one)
and returns the current beat. Sometimes we just want to look at the
current beat without having to increment it which we can do via look:
Checking the Beat
puts tick #=> 0
puts tick #=> 1
puts look #=> 1
puts look #=> 1
In this code we tick the beat up twice and then call look twice. We’ll
see the following values in the log: 0, 1, 1, 1. The first two
ticks returned 0, then 1 as expected, then the two looks just
returned the last beat value twice which was 1.
Rings
So now we can advance the beat with tick and check the beat with
look. What next? We need something to tick over. Sonic Pi uses rings
for representing riffs, melodies and rhythms and the tick system has
been specifically designed to work very closely with them. In fact,
rings have their own dot version of tick which does two things. Firstly,
it acts like a regular tick and increments the beat. Secondly it looks
up the ring value using the beat as the index. Let’s take a look:
Rings
puts (ring :a, :b, :c).tick #=> :a
.tick is a special dot version of tick which will return the first
value of the ring :a. We can grab each of the values in the ring by
calling .tick multiple times:
Rings · 2
puts (ring :a, :b, :c).tick #=> :a
puts (ring :a, :b, :c).tick #=> :b
puts (ring :a, :b, :c).tick #=> :c
puts (ring :a, :b, :c).tick #=> :a
puts look #=> 3
Take a look at the log and you’ll see :a, :b, :c and then :a
again. Notice that look returns 3. Calls to .tick act just like
they are regular calls to tick - they increment the local beat.
A Live Loop Arpeggiator
The real power comes when you mix tick with rings and
live_loops. When combined we have all the tools we need to both build
and understand a simple arpegiator. We need just four things:
A ring containing the notes we want to loop over.
A means of incrementing and obtaining the beat.
The ability to play a note based on the current beat.
A loop structure to keep the arpegiator repeating.
These concepts can all be found in the following code:
A Live Loop Arpeggiator
notes = (ring 57, 62, 55, 59, 64)
live_loop :arpdo
use_synth :dpulse
play notes.tick, release:0.2
sleep 0.125
end
Let’s look at each of these lines. First we define our ring of notes
which we’ll continually play. We then create a live_loop called :arp
which loops round for us. Each time round the live_loop we set our
synth to :dpulse and then play the next note in our ring using
.tick. Remember that this will increment our beat counter and use the
latest beat value as an index into our notes ring. Finally, we wait for
an eighth of a beat before looping round again.
Multiple Simultaneous Beats
A really important thing to know is that ticks are local to the
live_loop. This means that each live_loop has its own independent
beat counter. This is much more powerful than having a global metronome
and beat. Let’s take a look at this in action:
Multiple Simultaneous Beats
notes = (ring 57, 62, 55, 59, 64)
with_fx :reverbdo
live_loop :arpdo
use_synth :dpulse
play notes.tick + 12, release:0.1
sleep 0.125
end
end
live_loop :arp2do
use_synth :dsaw
play notes.tick - 12, release:0.2
sleep 0.75
end
Clashing Beats
A big cause of confusion with Sonic Pi’s tick system is when people want
to tick over multiple rings in the same live_loop:
Clashing Beats
use_bpm 300
use_synth :blade
live_loop :foodo
play (ring :e1, :e2, :e3).tick
play (scale :e3, :minor_pentatonic).tick
sleep 1
end
Even though each live_loop has its own independent beat counter, we’re
calling .tick twice within the same live_loop. This means that the
beat will be incremented twice every time round. This can produce some
interesting polyrhythms but is often not what you want. There are two
solutions to this problem. One option is to manually call tick at the
start of the live_loop and then use .look to look up the current
beat in each live_loop. The second solution is to pass a unique name
to each call to .tick such as .tick(:foo). Sonic Pi will then create
and track a separate beat counter for each named tick you use. That way
you can work with as many beats as you need! See the section on named
ticks in 9.4 of the built-in tutorial for more information.
Bringing it all together
Let’s bring all this knowledge of ticks, rings and live_loops
together for a final fun example. As usual, don’t treat this as a
finished piece. Start changing things and play around with it and see
what you can turn it into. See you next time…
Bringing it all together · 9
use_bpm 240
notes = (scale :e3, :minor_pentatonic).shuffle
live_loop :foodo
use_synth :blade
with_fx :reverb, reps:8, room:1do
tick
co = (line 70, 130, steps:32).tick(:cutoff)
play (octs :e3, 3).look, cutoff: co, amp:2
play notes.look, amp:4
sleep 1
end
end
live_loop :bardo
tick
sample :bd_adaif (spread 1, 4).look
use_synth :tb303
co = (line 70, 130, steps:16).look
r = (line 0.1, 0.5, steps:64).mirror.look
play notes.look, release: r, cutoff: co
sleep 0.5
end
A.12 Sample Slicing
Way back in episode 3 of this Sonic Pi series we looked at how to loop,
stretch and filter one of the most famous drum breaks of all time - the
Amen Break. In this tutorial we’re going to take this one step further
and learn how to slice it up, shuffle the slices and glue it back
together in a completely new order. If that sounds a bit wild to you,
don’t worry, it will all become clear and you’ll soon master a powerful
new tool for your live coded sets.
Sound as Data
Before we get started let’s just take a brief moment to understand how
to work with samples. By now, you’ve all hopefully played with Sonic
Pi’s powerful sampler. If not, there’s no time like the present! Boot up
your Raspberry Pi, launch Sonic Pi from the Programming menu, type the
following into a fresh buffer and then hit the Run button to hear a
pre-recorded drum beat:
Sound as Data
sample :loop_amen
A recording of a sound is simply represented as data - lots of numbers
between -1 and 1 which represent the peaks and troughs of the sound
wave. If we play those numbers back in order, we get the original
sound. However, what’s to stop us from playing them back in a different
order and creating a new sound?
How are samples actually recorded? It’s actually pretty simple once you
understand the basic physics of sound. When you make a sound - for
example by hitting a drum, the noise travels through the air in a
similar fashion to how the surface of a lake ripples when you throw a
pebble into it. When those ripples reach your ears, your eardrum moves
sympathetically and converts those movements into the sound you hear.
If we wish to record and play back the sound, we therefore need a way
of capturing, storing and reproducing those ripples. One way is to use
a microphone which acts like an eardrum and moves back and forth as the
sound ripples hit it. The microphone then converts its position into a
tiny electric signal which is then measured many times a second. These
measurements are then represented as a series of numbers between -1 and
1.
If we were to plot a visualisation of the sound it would be a simple
graph of data with time on the x axis and microphone/speaker position
as a value between -1 and 1 on the y axis. You can see an example of
such a graph at the top of the diagram.
Playing Part of a Sample
So, how do we code Sonic Pi to play a sample back in a different order?
To answer this question we need to take a look at the start: and
finish: opts for sample. These let us control the start and finish
positions of our playback of the numbers which represent the sound. The
values for both of these opts are represented as a number between 0 and
1 where 0 represents the start of the sample and 1 is the end. So,
to play the first half of the Amen Break, we just need to specify a
finish: of 0.5:
Playing Part of a Sample
sample :loop_amen, finish:0.5
We can add in a start: value to play an even smaller section of the sample:
Playing Part of a Sample · 2
sample :loop_amen, start:0.25, finish:0.5
For fun, you can even have the finish: opt’s value be beforestart: and it will play the section backwards:
Playing Part of a Sample · 3
sample :loop_amen, start:0.5, finish:0.25
Re-ordering Sample Playback
Now that we know that a sample is simply a list of numbers that can be
played back in any order and also how to play a specific part of a
sample we can now start having fun playing a sample back in the ‘wrong’
order.
Let’s take our Amen Break and chop it up into 8 equally-sized slices and
then shuffle the pieces around. Take a look at the diagram: at the top
A) represents the graph of our original sample data. Chopping it into 8
slices gives us B) - notice that we’ve given each slice a different
colour to help distinguish them. You can see each slice’s start and
finish values at the top. Finally C) is one possible re-ordering of the
slices. We can then play this back to create a new beat. Take a look at
the code to do this:
Re-ordering Sample Playback
live_loop :beat_slicerdo
slice_idx = rand_i(8)
slice_size = 0.125
s = slice_idx * slice_size
f = s + slice_size
sample :loop_amen, start: s, finish: f
sleep sample_duration :loop_amen, start: s, finish: f
end
we choose a random slice to play which should be a random number
between 0 and 7 (remember that we start counting at 0). Sonic Pi has
a handy function for exactly this: rand_i(8). We then store this
random slice index in the variable slice_idx.
We define our slice_size which is 1/8 or 0.125. The slice_size is
necessary for us to convert our slice_idx into a value between 0
and 1 so we can use it as our start: opt.
We calculate the start position s by multiplying the slice_idx by
the slice_size.
We calculate the finish position f by adding the slice_size to
the start position s.
We can now play the sample slice by plugging in the s and f
values into the start: and finish: opts for sample.
Before we play the next slice we need to know how long to sleep
which should be the duration of the sample slice. Luckily, Sonic Pi
has us covered with sample_duration which accepts all the same opts
as sample and simply returns the duration. Therefore, by passing
sample_duration our start: and finish: opts, we can find out
the duration of a single slice.
We wrap all of this code in a live_loop so that we continue to pick
new random slices to play.
Bringing it all together
Let’s combine everything we’ve seen so far into a final example which
demonstrates how we can take a similar approach to combine randomly
sliced beats with some bass to create the start of an interesting
track. Now it’s your turn - take the code below as a starting point and
see if you can take it in your own direction and create something new…
Bringing it all together · 10
live_loop :sliced_amendo
n = 8
s = line(0, 1, steps: n).choose
f = s + (1.0 / n)
sample :loop_amen, beat_stretch:2, start: s, finish: f
synth :beep, note: n + 36, release:0.1, wave:0, cutoff: co
synth :tb303, note: n, release:0.2, wave:0, cutoff: co
sleep (ring 0.125, 0.25).look
end
end
A.13 Code a Probabilistic Sequencer
In a previous episode of this Sonic Pi series we explored the power of
randomisation to introduce variety, surprise and change into our live
coded tracks and performances. For example, we randomly picked notes
from a scale to create never-ending melodies. Today we’re going to learn
a new technique which uses randomisation for rhythm - probabilistic
beats!
Probability
Before we can start making new beats and synth rhythms we need to take a
quick dive into the basics of probability. This might sound daunting and
complicated, but really it’s just as simple as rolling a dice -
honestly! When you take a regular 6 sided board game dice and roll it
what’s actually happening? Well, firstly you’ll roll either a 1, 2, 3,
4, 5 or 6 with exactly the same chance of getting any of the numbers. In
fact, given that it’s a 6 sided dice, on average (if you roll lots and
lots of times) you’ll throw a 1 every 6 throws. This means you have a 1
in 6 chance of throwing a 1. We can emulate dice rolls in Sonic Pi with
the fn dice. Let’s roll one 8 times:
Probability
8.times do
puts dice
sleep 1
end
Notice how the log prints values between 1 and 6 just as if we’d rolled
a real dice ourselves.
Random Beats
Now imagine you had a drum and every time you were about to hit it you
rolled a dice. If you rolled a 1, you hit the drum and if you rolled any
other number you didn’t. You now have a probabilistic drum machine
working with a probability of 1/6! Let’s hear what that sounds like:
Random Beats
live_loop :random_beatdo
sample :drum_snare_hardif dice == 1
sleep 0.125
end
Let’s quickly go over each line to make sure everything is very
clear. First we create a new live_loop called :random_beat which
will continually repeat the two lines between do and end. The first
of these lines is a call to sample which will play a pre-recorded
sound (the :drum_snare_hard sound in this case). However, this line
has a special conditional if ending. This means that the line will
only be executed if the statement on the right hand side of the if is
true. The statement in this case is dice == 1. This calls our dice
function which, as we have seen, returns a value between 1 and 6. We
then use the equality operator == to check to see if this value is
1. If it is 1, then the statement resolves to true and our snare
drum sounds, if it isn’t 1 then the statement resolves to false and
the snare is skipped. The second line simply waits for 0.125 seconds
before rolling the dice again.
Changing Probabilities
Those of you that have played role play games will be familiar with lots
of strangely shaped dice with different ranges. For example there is the
tetrahedron shaped dice which has 4 sides and even a 20 sided dice in
the shape of a icosahedron. The number of sides on the dice changes the
chance, or probability of rolling a 1. The fewer sides, the more likely
you are to roll a 1 and the more sides the less likely. For example,
with a 4 sided dice, there’s a one in 4 chance of rolling a 1 and with a
20 sided dice there’s a one in 20 chance. Luckily, Sonic Pi has the
handy one_in fn for describing exactly this. Let’s play:
Changing Probabilities
live_loop :different_probabilitiesdo
sample :drum_snare_hardif one_in(6)
sleep 0.125
end
Start the live loop above and you’ll hear the familiar random
rhythm. However, don’t stop the code running. Instead, change the 6 to
a different value such as 2 or 20 and hit the Run button
again. Notice that lower numbers mean the snare drum sounds more
frequently and higher numbers mean the snare triggers fewer
times. You’re making music with probabilities!
Combining Probabilities
Things get really exciting when you combine multiple samples being
triggered with different probabilities. For example:
Combining Probabilities
live_loop :multi_beatdo
sample :elec_hi_snareif one_in(6)
sample :drum_cymbal_closedif one_in(2)
sample :drum_cymbal_pedalif one_in(3)
sample :bd_hausif one_in(4)
sleep 0.125
end
Again, run the code above and then start changing the probabilities to
modify the rhythm. Also, try changing the samples to create an entirely
new feel. For example try changing :drum_cymbal_closed to
:bass_hit_c for extra bass!
Repeatable Rhythms
Next, we can use our old friend use_random_seed to reset the random
stream after 8 iterations to create a regular beat. Type the following
code to hear a much more regular and repeating rhythm. Once you hear the
beat, try changing the seed value from 1000 to another number. Notice
how different numbers generate different beats.
Repeatable Rhythms
live_loop :multi_beatdo
use_random_seed 1000
8.times do
sample :elec_hi_snareif one_in(6)
sample :drum_cymbal_closedif one_in(2)
sample :drum_cymbal_pedalif one_in(3)
sample :bd_hausif one_in(4)
sleep 0.125
end
end
One thing I tend to do with this kind of structure is to remember which
seeds sound good and make a note of them. That way I can easily
re-create my rhythms in future practice sessions or performances.
Bringing it all together
Finally, we can throw in some random bass to give it some nice melodic
content. Notice that we can also use our newly discovered probabilistic
sequencing method on synths just as well as samples. Don’t leave it at
that though - tweak the numbers and make your own track with the power
of probabilities!
Bringing it all together · 11
live_loop :multi_beatdo
use_random_seed 2000
8.times do
c = rrand(70, 130)
n = (scale :e1, :minor_pentatonic).take(3).choose
synth :tb303, note: n, release:0.1, cutoff: c if rand < 0.9
sample :elec_hi_snareif one_in(6)
sample :drum_cymbal_closedif one_in(2)
sample :drum_cymbal_pedalif one_in(3)
sample :bd_haus, amp:1.5if one_in(4)
sleep 0.125
end
end
A.14 Amplitude Modulation
This month we’re going to take a deep dive into one of Sonic Pi’s most
powerful and flexible audio FX - the :slicer. By the end of this
article you will have learned how to manipulate the overall volume of
parts of our live coded sound in powerful new ways. This will allow you
to create new rhythmic and timbral structures and broaden your sonic
possibilities.
Slice that Amp
So, what does the :slicer FX actually do? One way to think about it
is that it’s just like having someone play around with the volume
control on your TV or home hi-fi. Let’s take a look but first, listen to
the deep growl of the following code which triggers the :prophet
synth:
Hear how the slicer acts like it’s muting and unmuting the audio with a
regular beat. Also, notice how the :slicer affects all the audio
generated between the do/end blocks. You can control the speed at which
it turns the audio on and off with the phase: opt which is short for
phase duration. Its default value is 0.25 which means 4 times a second
at the default BPM of 60. Let’s make it faster:
Now, play with different phase: durations yourself. Try longer and
shorter values. See what happens when you choose a really short
value. Also, try different synths such as :beep or :dsaw and
different notes. Take a look at the following diagram to see how
different phase: values change the number of amplitude changes per
beat.
Phase duration is the length of time for one on/off cycle. Therefore
smaller values will make the FX switch on and off much faster than
larger values. Good values to start playing with are 0.125, 0.25,
0.5 and 1.
Control Waves
By default, the :slicer FX uses a square wave to manipulate the
amplitude through time. This is why we hear the amplitude on for a
period, then immediately off for a period, then back on again. It turns
out that the square wave is just one of 4 different control waves that
are supported by :slicer. The others are saw, triangle and
(co)sine. Take a look at the diagram below to see what these look
like. We can also hear what they sound like. For example, the following
code uses (co)sine as the control wave. Hear how the sound doesn’t turn
on and off abruptly but instead smoothly fades in and out:
Control Waves
with_fx :slicer, phase:0.5, wave:3do
synth :dsaw, note::e3, release:8, cutoff:120
synth :dsaw, note::e2, release:8, cutoff:100
end
Have a play with the different wave forms by changing the wave: opt to
0 for saw, 1 for square, 2 for triangle and 3 for sine. See how
different waves sound with different phase: opts too.
Each of these waves can be inverted with the invert_wave: opt which
flips it on the y axis. For example, in a single phase the saw wave
typically starts high, and slowly goes down before jumping back to the
top. With invert_wave:1 it will start low and slowly go up before
jumping back down again. Additionally, the control wave can be started
at different points with the phase_offset: opt which should be a value
between 0 and 1. By playing around with phase:, wave:,
invert_wave: and phase_offset opts you can dramatically change how
the amplitude is modified through time.
Setting your levels
By default, :slicer switches between amplitude values 1 (fully loud)
and 0 (silent). This can be changed with the amp_min: and amp_max:
opts. You can use this alongside the sine wave setting to create a
simple tremolo effect:
This is just like grabbing the volume knob on your hi-fi and moving it
up and down just a little so the sound ‘wobbles’ in and out.
Probabilities
One of :slicer’s powerful features is its ability to use probability
to choose whether or not to turn the slicer on or off. Before the
:slicer FX starts a new phase it rolls a dice and based on the result
either uses the selected control wave or keeps the amplitude off. Let’s
take a listen:
Hear how we now have an interesting rhythm of pulses. Try changing the
probability: opt to a different value between 0 and 1. Values
closer to 0 will have more space between each sound due to the
likelihood of the sound being triggered being much lower.
Another thing to notice is that the probability system in the FX is just
like the randomisation system accessible via fns such as rand and
shuffle. They are both completely deterministic. This means that each
time you hit Run you’ll hear exactly the same rhythm of pulses for a
given probability. If you would like to change things around you can use
the seed: opt to select a different starting seed. This works exactly
the same as use_random_seed but only affects that particular FX.
Finally, you can change the ‘resting’ position of the control wave when
the probability test fails from 0 to any other position with the
prob_pos: opt:
One really fun thing to do is to use :slicer to chop a drum beat in
and out:
Slicing Beats
with_fx :slicer, phase:0.125do
sample :loop_mika
end
This allows us to take any sample and create new rhythmical possibilities
which is a lot of fun. However, one thing to be careful about is to make
sure that the tempo of the sample matches the current BPM in Sonic Pi
otherwise the slicing will sound totally off. For example, try swapping
:loop_mika with the loop_amen sample to hear how bad this can sound
when the tempos don’t align.
Changing tempo
As we have already seen, changing the default BPM with use_bpm will
make all the sleep times and synth envelope durations grow or shrink to
match the beat. The :slicer FX honours this too, as the phase: opt
is actually measured in beats not seconds. We can therefore fix the
issue with loop_amen above by changing the BPM to match the sample:
Changing tempo
use_sample_bpm :loop_amen
with_fx :slicer, phase:0.125do
sample :loop_amen
end
Bringing it all together
Let’s apply all these ideas into a final example that only uses the
:slicer FX to create an interesting combination. Go ahead, start
changing it and make it into your own piece!
Bringing it all together · 12
live_loop :dark_mistdo
co = (line 70, 130, steps:8).tick
with_fx :slicer, probability:0.7, prob_pos:1do
synth :prophet, note::e1, release:8, cutoff: co
end
with_fx :slicer, phase: [0.125, 0.25].choose do
sample :guit_em9, rate:0.5
end
sleep 8
end
live_loop :crashing_wavesdo
with_fx :slicer, wave:0, phase:0.25do
sample :loop_mika, rate:0.5
end
sleep 16
end
A.15 Five Live Coding Techniques
In this month’s Sonic Pi tutorial we’re going to take a look at how you
can start treating Sonic Pi like a real instrument. We therefore need to
start thinking of code in a completely different way. Live coders think
of code in a similar way to how violinists think of their bow. In fact,
just like a violinist can apply various bowing techniques to create
different sounds (long slow motions vs short fast hits) we will explore
five of the basic live coding techniques that Sonic Pi enables. By the
end of this article you’ll be able to start practicing for your own live
coded performances.
1. Memorise the Shortcuts
The first tip to live coding with Sonic Pi is to start using the
shortcuts. For example, instead of wasting valuable time reaching for
the mouse, moving it over to the Run button and clicking, you can simply
press alt and r at the same time which is much faster and keeps your
fingers at the keyboard ready for the next edit. You can find out the
shortcuts for the main buttons at the top by hovering the mouse
over them. See section 10.2 of the built-in tutorial for the full list of
shortcuts.
When performing, one fun thing to do is to add a bit of flair with your
arm motion when hitting shortcuts. For example, it’s often good to
communicate to the audience when you’re about to make a change - so
embellish your movement when hitting alt-r just like a guitarist would
do when hitting a big power chord.
2. Manually Layer your Sounds
Now you can trigger code instantly with the keyboard, you can instantly
apply this skill for our second technique which is to layer your sounds
manually. Instead of ‘composing’ using lots of calls to play, and
sample separated by calls to sleep we will have one call to play
which we will manually trigger using alt-r. Let’s try it. Type the
following code into a fresh buffer:
2. Manually Layer your Sounds
synth :tb303, note::e2 - 0, release:12, cutoff:90
Now, hit Run and whilst the sound is playing, modify the code in order
to drop down four notes by changing it to the following:
2. Manually Layer your Sounds · 2
synth :tb303, note::e2 - 4, release:12, cutoff:90
Now, hit Run again, to hear both sounds playing at the same time. This
is because Sonic Pi’s Run button doesn’t wait for any previous code to
finish, but instead starts the code running at the same time. This means
you can easily layer lots of sounds manually with minor or major
modifications between each trigger. For example, try changing both the
note: and the cutoff: opts and then re-trigger.
You can also try this technique with long abstract samples. For example:
2. Manually Layer your Sounds · 3
sample :ambi_lunar_land, rate:1
Try starting the sample off, and then progressively halving the rate:
opt between hitting Run from 1 to 0.5 to 0.25 to 0.125 and then
even try some negative values such as -0.5. Layer the sounds together
and see where you can take it. Finally, try adding some FX.
When performing, working with simple lines of code in this way means
that an audience new to Sonic Pi has a good chance to follow what you’re
doing and relate the code that they can read to the sounds they are
hearing.
3. Master Live Loops
When working with more rhythmic music, it can often be hard to manually
trigger everything and keep good time. Instead, it is often better to
use a live_loop. This provides repetition for your code whilst also
giving the ability to edit the code for the next time round the
loop. They also will run at the same time as other live_loops which
means you can layer them together both with each other and manual code
triggers. Take a look at section 9.2 of the built-in tutorial for more
information about working with live loops.
When performing, remember to make use of live_loop’s sync: opt to
allow you to recover from accidental runtime mistakes which stop the
live loop running due to an error. If you already have the sync: opt
pointing to another valid live_loop, then you can quickly fix the
error and re-run the code to re-start things without missing a beat.
4. Use the Main Mixer
One of Sonic Pi’s best kept secrets is that it has a main mixer
through which all sound flows. This mixer has both a low pass filter and
a high pass filter built-in, so you can easily perform global
modifications to the sound. The main mixer’s functionality can be
accessed via the fn set_mixer_control!. For example, whilst some code
is running and making sound, enter this into a spare buffer and hit
Run:
set_mixer_control! lpf:50
After you run this code, all existing and new sounds will have a low
pass filter applied to them and will therefore sound more muffled. Note
that this means that the new mixer values stick until they are changed
again. However, if you want, you can always reset the mixer back to its
default state with reset_mixer!. Some of the currently supported opts
are: pre_amp:, lpf:hpf:, and amp:. For the full list, see the
built-in docs for set_mixer_control!.
Use the mixer’s *_slide opts to slide one or many opts values over
time. For example, to slowly slide the mixer’s low pass filter down from
the current value to 30, use the following:
4. Use the Main Mixer
set_mixer_control! lpf_slide:16, lpf:30
You can then slide quickly back to a high value with:
4. Use the Main Mixer · 2
set_mixer_control! lpf_slide:1, lpf:130
When performing, it’s often useful to keep a buffer free for working
with the mixer like this.
5. Practice
The most important technique for live coding is practice. The most
common attribute across professional musicians of all kinds is that they
practice playing with their instruments - often for many hours a
day. Practice is just as important for a live coder as a
guitarist. Practice allows your fingers to memorise certain patterns and
common edits so you can type and work with them more fluently. Practice
also gives you opportunities to explore new sounds and code constructs.
When performing, you’ll find the more practice you do, the easier it
will be for you to relax into the gig. Practice will also give you a
wealth of experience to draw from. This can help you understand which
kinds of modifications will be interesting and also work well with the
current sounds.
Bringing it all together
This month, instead of giving you a final example that combines all the
things discussed, let’s part by setting down a challenge. See if you can
spend a week practicing one of these ideas every day. For example, one
day practice manual triggers, the next do some basic live_loop work
and the following day play around with the main mixer. Then
repeat. Don’t worry if things feel slow and clunky at first - just keep
practicing and before you know it you’ll be live coding for a real
audience.
A.16 How to Practice Live Coding
Last month we took a look at five important techniques for mastering
live coding - in other words, we explored how we could use Sonic Pi to
approach code in the same way we would approach a musical instrument. One
of the important concepts that we discussed was practice. This month
we’re going to take a deeper dive into understanding why live coding
practice is important and how you might start.
Practice regularly
The most important piece of advice is to make sure you practice
regularly. As a rule I typically practice for 1-2 hours a day, but 20
mins is just fine when you’re starting out. Little but often is what
you’re aiming for - so if you can only manage 10 minutes, that’s a great
start.
Practice tip #1 - start to develop a practice routine. Find a nice time
in the day that works for you and try and practice at that time as many
days of the week as you can. Before long you’ll be looking forward to your
regular session.
Learn to Touch Type
If you watch a professional musician performing on stage you’ll likely
notice a few things. Firstly, when they play they don’t stare at their
instrument. Their fingers, arms and bodies know which keys to press,
strings to pluck or drums to hit without them having to think about it
too much. This is known as “muscle memory” and although it might sound
like something only professionals can do - it’s just the same as when
you first learned to walk or ride a bike - practicing through
repetition. Live coders use muscle memory to free their minds from
having to think about where to move their fingers so they can focus on
the music. This is called touch-typing - typing without having to look
at the keyboard.
Practice tip #2 - learn how to touch type. There are many apps, websites
and even games which can help you achieve this. Find one you like the
look of and stick at it until you can code without looking down.
Code whilst standing
The body of a musician is conditioned for playing their instrument. For
example, a trumpet player needs to be able to blow hard, a guitar player
needs to be able to grip the fretboard with strength and a drummer needs
to be able to continually hit the drums for long periods of time. So,
what’s physical about live coding? Just like DJs, live coders typically
perform whilst standing up and some even dance whilst they code! If you
practice live coding whilst sitting at a desk and then have to get up
and stand at a gig, you’ll likely find the difference very difficult and
frustrating.
Practice tip #3 - stand whilst you practice. The easiest way to do this
is to use a standing height desk. However, if like me you don’t have one
at home, there’s a couple of low-fi options. The approach I take is to
use an ironing board which happens to work rather well. Another is to
stack some boxes or large books on a normal desk and place your keyboard
on top of that. Also, make sure you stretch before you start practicing
and try and dance a little during the session. Remember, nobody is
watching you, so have fun and you’ll feel much more natural on stage.
Practice setting up
Most instruments require some assembly and tuning before they can be
played. Unless you’re a rockstar with a bus full of roadies, you’ll have
to set up your own instrument before your gig. This is often a stressful
time and it is easy for problems to occur. One way to help with this is
to incorporate the setup process into your practice sessions.
Practice tip #4 - treat setting up as an important part of your
practice. For example, have a box or bag that you can keep your
Raspberry Pi and keyboard in etc. Before each practice session, take out
all the parts, connect everything, and work through the boot process
until you have Sonic Pi running and can make sounds. Once you’ve
finished practicing, take the time to carefully pack everything away
afterwards. This may take some time at first, but before long you’ll be
able to setup and pack everything away incredibly quickly without having
to think about it.
Experiment Musically
Once you’ve set up and are ready to start making music, you might find
yourself struggling to know where to start. One problem many people
face is that they might have a good idea of the kinds of sounds they
want to make, but are frustrated that they can’t produce them. Some
people don’t even know what kind of sounds they want to make! The first
thing to do is not to worry - this is very common and happens to every
musician - even if they’ve been practicing for a long time. It is much
more important to be making sounds you don’t like than not making any
sounds at all.
Practice tip #5 - spend time making sounds and music you don’t like. Try
to make time to explore new sounds and ideas. Don’t worry that it might
sound terrible if it’s not the style you’re looking for. When you’re
experimenting like this you increase the chance of stumbling over a
sound or combination of sounds which you love! Even if 99% of the sounds
you make are bad, that 1% might be the riff or intro to your new
track. Forget the things you don’t like and remember the parts you
do. This is even easier when you’re making music with code - just hit
save!
Hear the Code
Many musicians can look at a musical score and hear the music in their
head without having to play it. This is a very useful skill and it’s
well worth incorporating into your live coding practice sessions. The
important point is to be able to have some understanding of what the code
is going to sound like. You don’t need to be able to hear it exactly in
your head, but instead it’s useful to know if the code is going to be
fast, slow, loud, rhythmic, melodic, random, etc. The final goal is then
to be able to reverse this process - to be able to hear music in your
head and know what code to write to make it. It may take you a long time
to master this, but once you do, you’ll be able to improvise on stage
and express your ideas fluently.
Practice tip #6 - write some code into Sonic Pi but don’t hit the Run
button. Instead, try to imagine what sound it is going to produce. Then,
hit Run, listen, and think about what you got right and what you
didn’t. Keep repeating this until it become a natural part of your
coding process. When I practice I normally have a good idea of what the
code will sound like. However, I still am occasionally surprised, and
then I’ll stop and spend some time thinking about why I was wrong. Each
time this happens, I learn new tricks which allow me to express myself
in new ways.
Remove all distractions
A common problem when practicing is to become distracted with other
things. Practicing is hard and requires real discipline regardless of
the kind of music you’re making - from jazz to classical to EDM. If
you’re struggling to get started or make progress, it’s often too easy
to hop on social media, or look something up on the internet etc. If
you’ve set yourself a target of 20 minutes of practice, it’s important
to try and spend all that time being as productive as possible.
Practice tip #7 - before you start practicing remove as many
distractions as possible. For example, disconnect from the internet, put
your phone in another room and try to practice in a quiet place where
you’re unlikely to be disturbed. Try to focus on coding music and you
can return to your distractions when you’ve finished.
Keep a practice diary
When you are practicing, you’ll often find your mind is full of new
exciting ideas - new musical directions, new sounds to try out, new
functions to write, etc. These ideas are often so interesting that you
might stop what you’re doing and start working on the idea. This is
another form of distraction!
Practice tip #8 - keep a practice diary by your keyboard. When you get
an exciting new idea, temporarily pause your practice session, quickly
jot the idea down, then forget about it and carry on practicing. You can
then spend some quality time thinking about and working on your ideas
after you’ve finished practicing.
Bringing it all together
Try to establish a practice routine which incorporates as many of these
ideas as possible. Try to keep the sessions as fun as possible but be
aware that some practice sessions will be hard and feel a little like
work. However, it will all be worth it once you’ve created your first
piece or given your first performance. Remember, practice is the key to
success!
A.17 Sample Stretching
When people discover Sonic Pi, one of the first things they learn is how
simple it is to play pre-recorded sounds using the sample
function. For example, you can play an industrial drum loop, hear the
sound of a choir or even listen to a vinyl scratch all via a single line
of code. However, many people don’t realise that you can actually vary
the speed that the sample is played back at for some powerful effects and a
whole new level of control over your recorded sounds. So, fire up a copy of
Sonic Pi and let’s get started stretching some samples!
Slowing Samples Down
To modify the playback rate of a sample we need to use the rate: opt:
Slowing Samples Down
sample :guit_em9, rate:1
If we specify a rate: of 1 then the sample is played back at the
normal rate. If we want to play it back at half speed we simply
use a rate: of 0.5:
Slowing Samples Down · 2
sample :guit_em9, rate:0.5
Notice that this has two effects on the audio. Firstly the sample sounds
lower in pitch and secondly it takes twice as long to play back (see the
sidebar for an explanation of why this is the case). We can even choose
lower and lower rates moving towards 0, so a rate: of 0.25 is a
quarter speed, 0.1 is a tenth of the speed, etc. Try playing with some
low rates and see if you can turn the sound into a low rumble.
Speeding Samples Up
In addition to making the sound longer and lower using a small rate, we
can use higher rates to make the sound shorter and higher. Let’s play
with a drum loop this time. First, take a listen to how it sounds at the
default rate of 1:
Speeding Samples Up
sample :loop_amen, rate:1
Now, let’s speed it up a little:
Speeding Samples Up · 2
sample :loop_amen, rate:1.5
Ha! We just moved musical genres from old-skool techno to jungle. Notice
how the pitch of each drum hit is higher as well as how the whole rhythm
speeds up. Now, try even higher rates and see how high and short you
can make the drum loop. For example, if you use a rate of 100, the
drum loop turns into a click!
Reverse Gear
Now, I’m sure many of you are thinking the same thing right now… “what
if you use a negative number for the rate?”. Great question! Let’s think
about this for a moment. If our rate: opt signifies the speed with
which the sample is played back, 1 being normal speed, 2 being
double speed, 0.5 being half speed, -1 must mean backwards! Let’s
try it on a snare. First, play it back at the normal rate:
Reverse Gear
sample :elec_filt_snare, rate:1
Now, play it backwards:
Reverse Gear · 2
sample :elec_filt_snare, rate: -1
Of course, you can play it backwards twice as fast with a rate of -2
or backwards at half speed with a rate of -0.5. Now, play around with
different negative rates and have fun. It’s particularly amusing with
the :misc_burp sample!
Sample, Rate and Pitch
One of the effects of rate modification on samples is that faster rates
result in the sample sounding higher in pitch and slower rates result in
the sample sounding lower in pitch. Another place you may
have heard this effect in every day life is when you’re cycling or
driving past a beeping pedestrian crossing - as you’re heading towards
the sound source the pitch is higher than when you’re moving away from the
sound - the so-called Doppler effect. Why is this?
Let’s consider a simple beep which is represented by a sine wave. If we
use an oscilloscope to plot a beep, we’ll see something like Figure A.
If we plot a beep an octave higher, we’ll see Figure B and an octave
lower will look like Figure C. Notice that the waves of higher notes are
more compact and the waves of lower notes are more spread out.
A sample of a beep is nothing more than a lot of numbers (x, y,
coordinates) which when plotted onto a graph will re-draw the original
curves. See figure D where each circle represents a coordinate. To turn
the coordinates back into audio, the computer works through each x value
and sends the corresponding y value to the speakers. The trick here is
that the rate at which the computer works through the x numbers does not
have to be the same as the rate with which they were recorded. In other
words, the space (representing an amount of time) between each circle
can be stretched or compressed. So, if the computer walks through the x
values faster than the original rate, it will have the effect of
squashing the circles closer together which will result in a higher
sounding beep. It will also make the beep shorter as we will work
through all the circles faster. This is shown in Figure E.
Finally, one last thing to know is that a mathematician called Fourier
proved that any sound is actually lots and lots of sine waves all
combined together. Therefore, when we compress and stretch any recorded
sound we’re actually stretching and compressing many sine waves all at
the same time in exactly this manner.
Pitch Bending
As we’ve seen, using a faster rate will make the sound higher in pitch
and a slower rate will make the sound lower in pitch. A very simple and
useful trick is to know that doubling the rate actually results in the
pitch being an octave higher and inversely halving the rate results in
the pitch being an octave lower. This means that for melodic samples,
playing it alongside itself at double/half rates actually sounds rather
nice:
Pitch Bending
sample :bass_trance_c, rate:1
sample :bass_trance_c, rate:2
sample :bass_trance_c, rate:0.5
However, what if we just want to alter the rate such that the pitch goes
up one semitone (one note up on a piano)? Sonic Pi makes this very easy
via the rpitch: opt:
Pitch Bending · 2
sample :bass_trance_c
sample :bass_trance_c, rpitch:3
sample :bass_trance_c, rpitch:7
If you take a look at the log on the right, you’ll notice that an
rpitch: of 3 actually corresponds to a rate of 1.1892 and a
rpitch: of 7 corresponds to a rate of 1.4983. Finally, we can even
combine rate: and rpitch: opts:
Pitch Bending · 3
sample :ambi_choir, rate:0.25, rpitch:3
sleep 3
sample :ambi_choir, rate:0.25, rpitch:5
sleep 2
sample :ambi_choir, rate:0.25, rpitch:6
sleep 1
sample :ambi_choir, rate:0.25, rpitch:1
Bringing it all together
Let’s take a look at a simple piece which combines these ideas. Copy it
into an empty Sonic Pi buffer, hit play, listen to it for a while and
then use it as a starting point for your own piece. See how much fun it
is to manipulate the playback rate of samples. As an added exercise try
recording your own sounds and play around with the rate to see what
wild sounds you can make.
This is the first of a short series of articles on how to use Sonic Pi
for sound design. We’ll be taking a quick tour of a number of different
techniques available for you to craft your own unique sound. The first
technique we’ll look at is called additive synthesis. This may sound
complicated - but if we expand each word slightly the meaning pops right
out. Firstly, additive means a combination of things and secondly
synthesis means to create sound. Additive synthesis therefore means
nothing more complicated than combining existing sounds to create new
ones. This synthesis technique dates back a very long time - for
example, pipe organs in the middle ages had lots of slightly different
sounding pipes which you could enable or disable with stops. Pulling out
the stop for a given pipe ‘added it to the mix’ making the sound richer
and more complex. Now, let’s see how we can pull out all the stops with
Sonic Pi.
Simple Combinations
Let’s start with the most basic sound there is - the humble pure-toned
sine wave:
Simple Combinations
synth :sine, note::d3
Now, let’s see how this sounds combined with a square wave:
Simple Combinations · 2
synth :sine, note::d3
synth :square, note::d3
Notice how the two sounds combine to form a new, richer sound. Of
course, we don’t have to stop there, we can add as many sounds as we
need. However, we need to be careful with how many sounds we add
together. Just like when we mix paints to create new colours, adding too
many colours will result in a messy brown, similarly - adding too many
sounds together will result in a muddy sound.
Blending
Let’s add something to make it sound a little brighter. We could
use a triangle wave at an octave higher (for that high bright sound) yet
only play it at amp 0.4 so it adds something extra to the sound rather
than taking it over:
Blending
synth :sine, note::d3
synth :square, note::d3
synth :tri, note::d4, amp:0.4
Now, try creating your own sounds by combining 2 or more synths at
different octaves and amplitudes. Also, note that you can play around
with each synth’s opts to modify each source sound before it is mixed in
for even more combinations of sounds.
Detuning
So far, when combining our different synths we’ve used either the same
pitch or switched octave. How might it sound if we didn’t stick to
octaves but instead chose a slightly higher or lower note? Let’s try it:
Detuning
detune = 0.7
synth :square, note::e3
synth :square, note::e3 + detune
If we detune our square waves by 0.7 notes we hear something that
perhaps doesn’t sound in tune or correct - a ‘bad’ note. However, as we
move closer to 0 it will sound less and less out of tune as the pitches
of the two waves get closer and more similar. Try it for yourself!
Change the detune: opt value from 0.7 to 0.5 and listen to the new
sound. Try 0.2, 0.1, 0.05, 0. Each time you change the value,
take a listen and see if you can hear how the sound is changing. Notice
that low detune values such as 0.1 produce a really nice ‘thick’
sound, with both slightly different pitches interacting with each other
in interesting, often surprising, ways.
Some of the built-in synths already include a detune option that does
exactly this in one synth. Try playing with the detune: opt of
:dsaw, :dpulse and :dtri.
Amplitude shaping
Another way we can finely craft our sound is to use a different envelope
and options for each synth trigger. For example this will allow you to
make some aspects of the sound percussive and other aspects ring out for
a period of time.
In the example above I have mixed in a noisy percussive element to the
sound along with some more persistent background rumbling. This was
achieved firstly by using two noise synths with middling cutoff values
(90 and 100) using short release times along with a noise with a
longer release time but with a low cutoff value (which makes the noise
less crisp and more rumbly.)
Bringing it all together
Let’s combine all these techniques to see if we can use additive
synthesis to re-create a basic bell sound. I’ve broken this example into
four sections. Firstly we have the ‘hit’ section which is the initial
onset part of the bell sound - so uses a short envelope (e.g. a
release: of around 0.1). Next we have the long ringing section in
which I’m using the pure sound of the sine wave. Notice that I’m often
increasing the note by roughly 12 and 24 which are the number of
notes in one and two octaves. I have also thrown in a couple of low sine
waves to give the sound some bass and depth. Finally, I used define to
wrap my code in a function which I can then use to play a melody. Try
playing your own melody and also messing around with the contents of the
:bell function until you create your own fun sound to play with!
Bringing it all together · 14
define :belldo |n|
# Triangle waves for the 'hit'
synth :tri, note: n - 12, release:0.1
synth :tri, note: n + 0.1, release:0.1
synth :tri, note: n - 0.1, release:0.1
synth :tri, note: n, release:0.2
# Sine waves for the 'ringing'
synth :sine, note: n + 24, release:2
synth :sine, note: n + 24.1, release:2
synth :sine, note: n + 24.2, release:0.5
synth :sine, note: n + 11.8, release:2
synth :sine, note: n, release:2
# Low sine waves for the bass
synth :sine, note: n - 11.8, release:2
synth :sine, note: n - 12, release:2
end
# Play a melody with our new bell!
bell :e3
sleep 1
bell :c2
sleep 1
bell :d3
sleep 1
bell :g2
A.19 Sound Design - Subtractive Synthesis
This is the second in a series of articles on how to use Sonic Pi for
sound design. Last month we looked at additive synthesis which we
discovered was the simple act of playing multiple sounds at the same
time to make a new combined sound. For example we could combine
different sounding synths or even the same synth at different pitches to
build a new complex sound from simple ingredients. This month we’ll look
at a new technique commonly called subtractive synthesis which is
simply the act of taking an existing complex sound and removing parts of
it to create something new. This is a technique which is commonly
associated with the sound of analog synthesisers of the 1960s and 1970s
but also with the recent renaissance of modular analog synths through
popular standards such as Eurorack.
Despite this sounding like a particularly complicated and advanced
technique, Sonic Pi makes it surprisingly simple and easy - so let’s
dive right in.
Complex Source Signal
For a sound to work well with subtractive synthesis, it typically needs
to be fairly rich and interesting. This doesn’t mean we need something
hugely complex - in fact, just a standard :square or :saw wave will
do:
Complex Source Signal
synth :saw, note::e2, release:4
Notice that this sound is already pretty interesting and contains many
different frequencies above :e2 (the second E on a piano) which add to
create the timbre. If that didn’t make much sense to you, try comparing
it with the :beep:
Complex Source Signal · 2
synth :beep, note::e2, release:4
As the :beep synth is just a sine wave, you’ll hear a much purer tone
and only at :e2 and none of the high crispy/buzzy sounds which you
heard in the :saw. It’s this buzziness and variation from a pure sine
wave that we can play with when we use subtractive synthesis.
Filters
Once we have our raw source signal, the next step is to pass it through
a filter of some kind which will modify the sound by removing or
reducing parts of it. One of the most common filters used for
subtractive synthesis is something called a low pass filter. This will
allow all the low parts of the sound through but will reduce or remove
the higher parts. Sonic Pi has a powerful yet simple to use FX system
that includes a low pass filter, called :lpf. Let’s play with it:
Filters
with_fx :lpf, cutoff:100do
synth :saw, note::e2, release:4
end
If you listen carefully you’ll hear how some of that buzziness and
crispiness has been removed. In fact, all the frequencies in the sound
above note 100 have been reduced or removed and only the ones below are
still present in the sound. Try changing that cutoff: point to
lower notes, say 70 and then 50 and compare the sounds.
Of course, the :lpf isn’t the only filter you can use to manipulate
the source signal. Another important FX is the high pass filter referred
to as :hpf in Sonic Pi. This does the opposite to :lpf in that it
lets the high parts of the sound through and cuts off the low parts.
Filters · 2
with_fx :hpf, cutoff:90do
synth :saw, note::e2, release:4
end
Notice how this sounds much more buzzy and raspy now that all the low
frequency sounds have been removed. Play around with the cutoff value -
notice how lower values let more of the original bass parts of the
source signal through and higher values sound increasingly tinny and
quiet.
Low Pass Filter
The low pass filter is such an important part of every subtractive
synthesis toolkit that it’s worth taking a deeper look at how it
works. This diagram shows the same sound wave (the :prophet synth)
with varying amounts of filtering. At the top, section A shows the audio
wave with no filtering. Notice how the wave form is very pointy and
contains lots of sharp edges. It is these hard, sharp angles that
produce the high crispy/buzzy parts of the sound. Section B shows the low
pass filter in action - notice how it is less pointy and more rounded
than the wave form above. This means that the sound will have fewer high
frequencies giving it a more mellow rounded feel. Section C shows the
low pass filter with a fairly low cutoff value - this means that even
more of the high frequencies have been removed from the signal resulting
in an even softer, rounder wave form. Finally, notice how the size of
the wave form, which represents the amplitude, decreases as we move from
A to C. Subtractive synthesis works by removing parts of the signal
which means that the overall amplitude is reduced as the amount of
filtering that is taking place increases.
Filter Modulation
So far we’ve just produced fairly static sounds. In other words, the
sound doesn’t change in any way for the entirety of its duration. Often
you might want some movement in the sound to give the timbre some
life. One way to achieve this is via filter modulation - changing the
filter’s options through time. Luckily Sonic Pi gives you powerful tools
to manipulate an FX’s opts through time. For example, you can set a
slide time to each modulatable opt to specify how long it should take
for the current value to linearly slide to the target value:
Filter Modulation
with_fx :lpf, cutoff:50do |fx|
control fx, cutoff_slide:3, cutoff:130
synth :prophet, note::e2, sustain:3.5
end
Let’s take a quick look at what’s going on here. Firstly we start an :lpf FX
block as normal with an initial cutoff: of a low 50. However, the first line
also finishes with the strange |fx| at the end. This is an optional part of
the with_fx syntax which allows you to directly name and control the running
FX synth. Line 2 does exactly this and controls the FX to set the
cutoff_slide: opt to 3 and the new target cutoff: to be 130. The FX will
now start sliding the cutoff: opt’s value from 50 to 130 over a period of
3 beats. Finally we also trigger a source signal synth so we can hear the effect
of the modulated low pass filter.
Bringing it all together
This is just a very basic taster of what’s possible when you use filters
to modify and change a source sound. Try playing with Sonic Pi’s many
built-in FX to see what fun sounds you can design. If your sound feels
too static, remember you can start modulating the options to create some
movement.
Let’s finish by designing a function which will play a new sound created
with subtractive synthesis. See if you can figure out what’s going on
here - and for the advanced Sonic Pi readers out there - see if you can
work out why I wrapped everything inside a call to at (please send
answers to @samaaron on Twitter).
Bringing it all together · 15
define :subt_synthdo |note, sus|
at do
with_fx :lpf, cutoff:40, amp:2do |fx|
control fx, cutoff_slide:6, cutoff:100
synth :prophet, note: note, sustain: sus
end
with_fx :hpf, cutoff_slide:0.01do |fx|
synth :dsaw, note: note + 12, sustain: sus
(sus * 8).times do
control fx, cutoff: rrand(70, 110)
sleep 0.125
end
end
end
end
subt_synth :e1, 8
sleep 8
subt_synth :e1 - 4, 8
A.20 Creative coding in the classroom with Sonic Pi
Code is one of the most creative media that humans have created. The
initially obscure symbols of parentheses and lambdas are not just deeply
rooted in science and mathematics, they are the closest we have managed
to get to casting the same kind of magical spells as Gandalf and Harry
Potter. I believe that this provides a powerful means of engagement in
our learning spaces. Through the magic of code we are able to conjure up
individually meaningful stories and learning experiences.
We are surrounded by magical experiences. From the sleight of hand of a
stage magician making the ball disappear into thin air, to the wonder of
seeing your favourite band perform on a big stage. It is these “wow”
moments that inspire us to pick up a magic book and learn the French
Drop or to start jamming power chords on an old guitar. How might we
create similarly deep and lasting senses of wonder that will motivate
people to practice and learn the fundamentals of programming?
Musical Engines and Notation
The histories of music and computers have been intricately woven together
since the inception of computing machines, or “engines” as Charles
Babbage’s powerful analytical engine was called. Back in 1842 the
Mathematician Ada Lovelace, who worked very closely with Babbage, saw
the creative potential of these engines. Whilst these first engines had
originally been designed to accurately solve hard maths problems, Ada
dreamt about making music with them:
”..the engine might compose elaborate and scientific pieces of music of
any degree of complexity or extent.” Ada Lovelace, 1842.
Of course, today in 2019 much of our music, regardless of genre, has
either been composed, produced or mastered with a digital
computer. Ada’s dream came true. It is even possible to trace the
history back even further. If you see coding as the art of writing
sequences of special symbols that instruct a computer to do specific
things, then musical composition is a very similar practice. In Western
music, the symbols are black dots positioned on a stave of lines that
tell the musician which notes to play and when. Intriguingly, if we
trace the roots of Western music notation back to the Italian
Benedictine monk, Guido d’Arezzo, we find that the dots and lines system
that modern orchestras use is just one of a number of notation systems
he worked on. Some of the others were much closer to what we might now
see as code.
In education, magical meaningful experiences with computers and
programming languages have been explored since the late ’60s. Computer
education pioneers Seymour Papert, Marvin Minsky and Cynthia Solomon
explored simple Lisp-based languages that moved pens over large pieces
of paper. With just a few simple commands it was possible to program the
computer to draw any picture. They even experimented by extending their
Logo language from drawing to music. Papert wrote about learning through
experiencing the reconstruction of knowledge rather than its
transmission. Getting people to play with things directly was an
important part of his group’s work.
Sonic Pi Performances
Jylda and Sam Aaron perform at the Thinking Digital Conference in the
Sage Gateshead. Photo credit: TyneSight Photos.
Sonic Pi has been used to perform in a wide range of venues such as
school halls, nightclubs, outdoor stages at musical festivals, college
chapels and prestigious music venues. For example the amazing Convo
project which brought 1000 children together in the Royal Albert Hall to
perform an ambitious new composition by composer Charlotte Harding. The
piece was written for traditional instruments, choirs, percussion and
Sonic Pi code. The pop-artist Jylda also performed with Sonic Pi in the
Sage Gateshead for the Thinking Digital Conference, where she created a
unique live-coded improvised remix of her song Reeled.
Sonic Pi used as one of the instruments as part of Convo at the Royal
Albert Hall. Photo credit: Pete Jones.
Live coding in the classroom
Sonic Pi is a code-based music creation and performance tool that builds
on all of these ideas. Unlike the majority of computing education
software, it is both simple enough to use for education and also
powerful enough for professionals. It has been used to perform in
international music festivals, used to compose in a range of styles from
classical, EDM and heavy metal, and was even reviewed in the Rolling
Stone magazine. It has a diverse community of over 1.5 million live
coders with a variety of backgrounds all learning and sharing their
ideas and thoughts through the medium of code. It is free to download
for Mac, PC and Raspberry Pi and includes a friendly tutorial that
assumes you know nothing about either code or music.
Sonic Pi was initially conceived as a response to the UK’s newly
released Computing curriculum in 2014. The goal was to find a motivating
and fun way to teach the fundamentals of programming. It turns out that
there is a lot in common and it’s huge fun to explain sequencing as
melody, iteration as rhythm, conditionals as musical variety. I
developed the initial designs and first iterations of the platform with
Carrie Anne Philbin, who brought a teacher’s perspective to the
project. Since then, Sonic Pi has undergone iterative improvements
thanks to the feedback gained from observing learners and collaborating
directly with educators in the classroom. A core design philosophy was
to never add a feature that couldn’t be easily taught to a 10 year old
child. This meant that most ideas had to be heavily refined and reworked
until they were simple enough. Making things simple whilst keeping them
powerful continues to be the hardest part of the project.
In order to provide the magical motivation, Sonic Pi’s design was never
limited to a pure focus on education. Ideally there would be famous
musicians and performers using Sonic Pi as a standard instrument
alongside guitars, drums, vocals, synths, violins, etc. These performers
would then act as motivational role models demonstrating the creative
potential of code. For this to be possible sufficient focus and effort
therefore had to be placed on making it a powerful instrument whilst
still keeping it simple enough for 10 year olds to pick up. In addition
to educators, I also worked directly with a variety of different artists
in classrooms, art galleries, studios and venues in the early stages of
Sonic Pi’s development. This provided essential feedback which enabled
Sonic Pi to grow and ultimately flourish as a tool for creative
expression.
There were a number of exciting and unexpected side effects of this dual
focus on education and professional musicians. Many of the features are
beneficial to both groups. For example, a lot of effort has been put
into making error messages more friendly and useful (rather than being a
huge complicated mess of jargon). This turns out to be very useful when
you write a bug while performing in front of thousands of
people. Additionally, functionality such as playing studio quality audio
samples, adding audio effects, providing access to live audio from the
microphone all turn out to make the learning experience more fun,
rewarding and ultimately meaningful.
The Sonic Pi community continues to grow and share amazing code
compositions, lesson plans, musical algorithms, and much more. Much of
this happens on our friendly forum in_thread (in-thread.sonic-pi.net)
which is home to a very diverse group of people that includes educators,
musicians, programmers, artists and makers. It is a real joy to see
people learn to use code to express themselves in new ways and for that
in turn to inspire others to do the same.
Some fun capabilities
From a Computer Science perspective, Sonic Pi provides you with the
building blocks to teach you the basics as found in the UK’s curriculum
such as sequencing, iteration, conditionals, functions, data structures,
algorithms, etc. However, it also builds on a number of important and
relevant concepts which have become adopted in mainstream industry such
as concurrency, events, pattern matching, distributed computing and
determinism - all whilst keeping things simple enough to explain to a 10
year old child.
Getting started is as simple as:
Some fun capabilities
play 70
A melody can be constructed with one more command, sleep:
Some fun capabilities · 2
play 70
sleep 1
play 72
sleep 0.5
play 75
In this example, we play the note 70 (roughly the 70th note on a piano),
wait for 1 second, play note 72, wait for half a second and then play
note 75. What’s interesting here is that with just two commands we have
access to pretty much all of Western notation (which notes to play and
when) and learners can code any melody they’ve ever heard. This leads to
huge variety in expressive outcomes whilst focussing on the same
computing concept: sequencing in this case.
Taking ideas from the professional music world, we can also play back
any recorded sound. Sonic Pi can play any audio file on your computer
but also has a number of sounds built-in to make things easy to get
started:
Some fun capabilities · 3
sample :loop_amen
This code will play back the drum break which was a pillarstone to early
hip-hop, Drum and Bass and Jungle. For example, a number of early
hip-hop artists played this drum break back at half speed to give it a
more laid-back feeling:
Some fun capabilities · 4
sample :loop_amen, rate:0.5
In the 90s a number of music scenes burst out of new technology which
enabled artists to take drum breaks like this apart and reassemble in a
different order. For example:
Some fun capabilities · 5
live_loop :jungledo
sample :loop_amen, onset: pick
sleep 0.125
end
In this example we introduce a basic loop called :jungle which picks a
random drum hit from our audio sample, waits for an eighth of a second
and then picks another drum hit. This results in an endless stream of
random drum beats to dance to whilst you experience what a loop is.
Sonic Pi
Lowering the many barriers of entry for creative experiences with code.
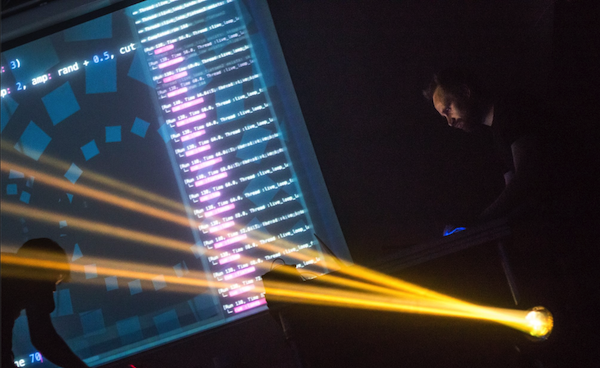
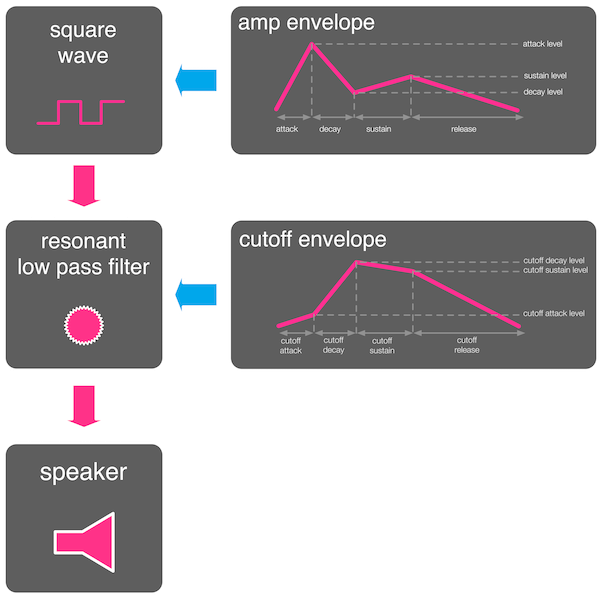
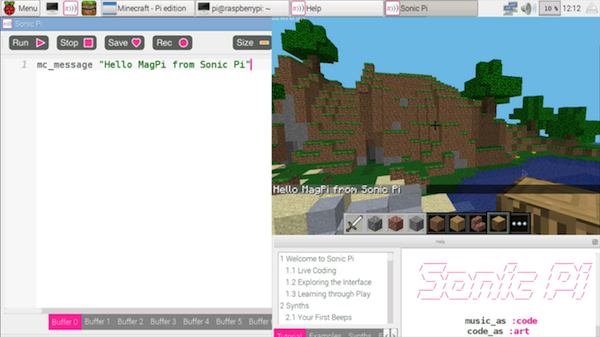
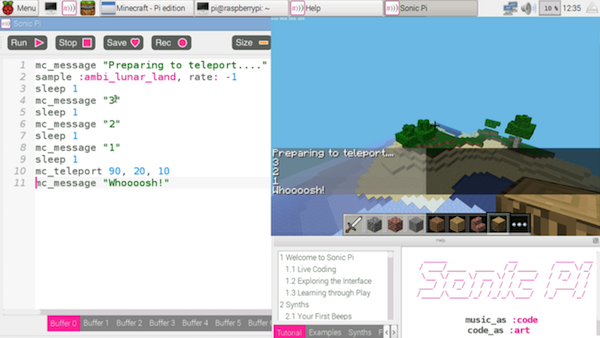
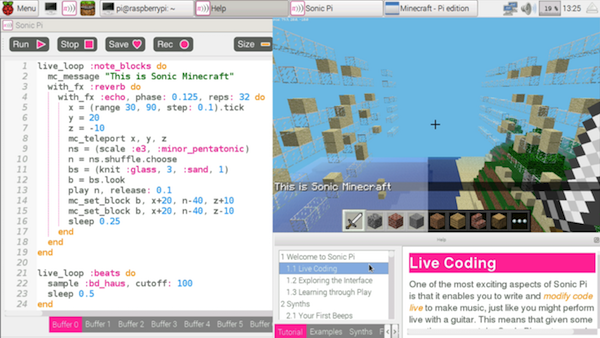
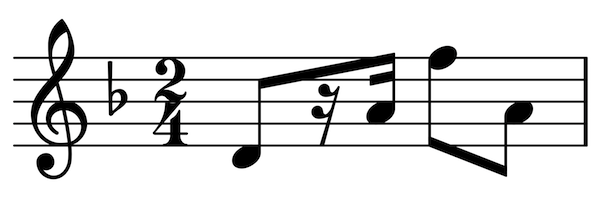
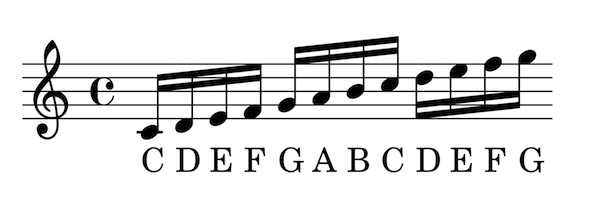
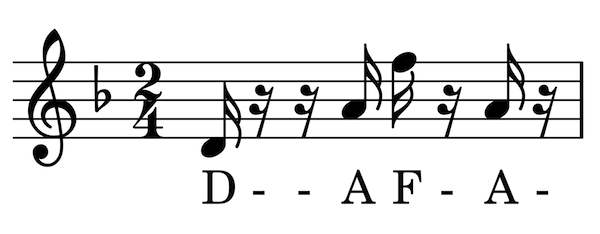
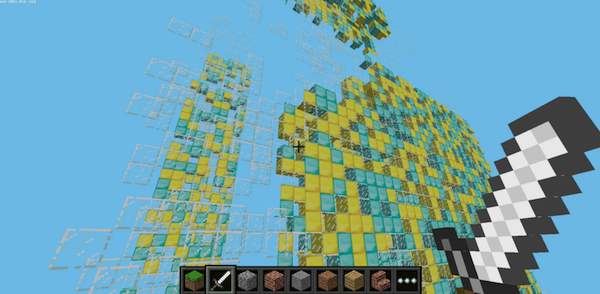
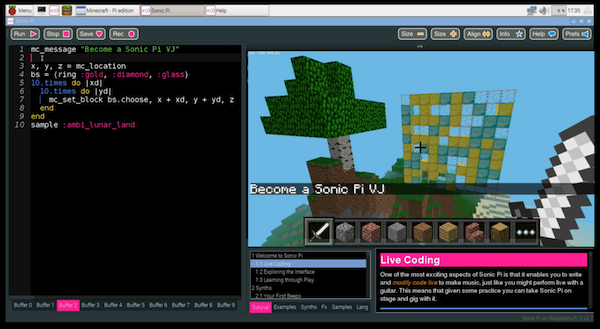
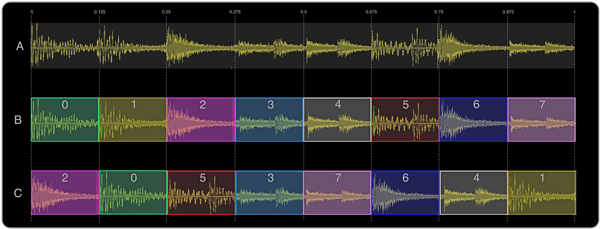
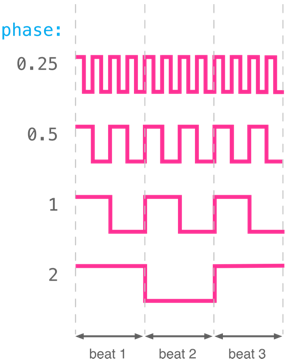
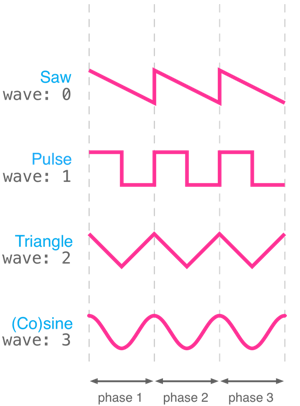
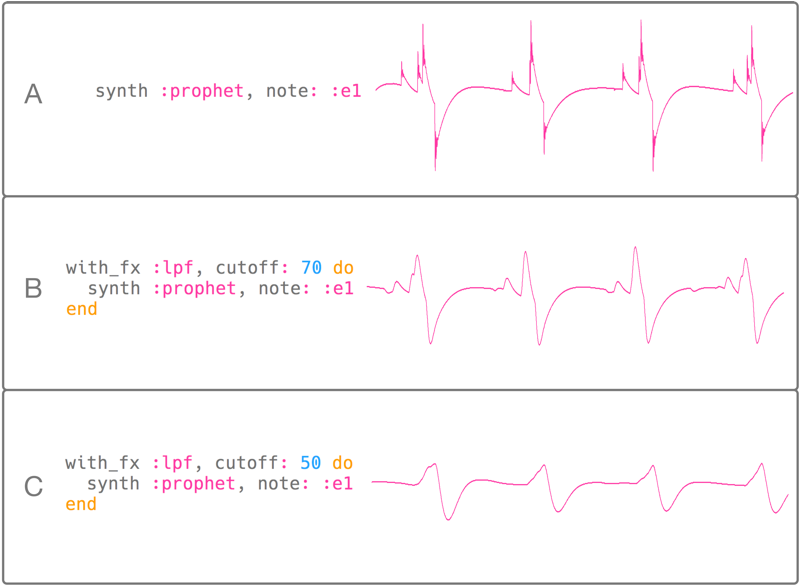
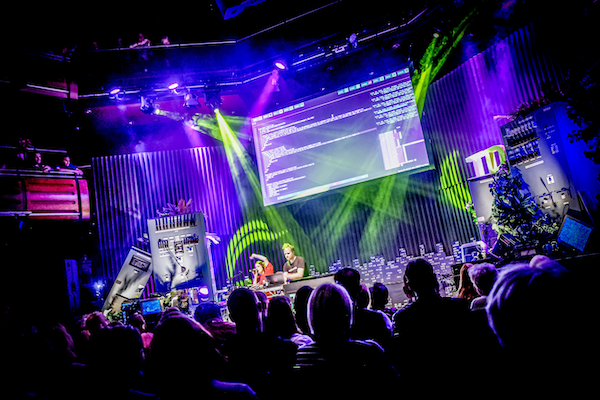 Jylda and Sam Aaron perform at the Thinking Digital Conference in the
Sage Gateshead. Photo credit: TyneSight Photos.
Jylda and Sam Aaron perform at the Thinking Digital Conference in the
Sage Gateshead. Photo credit: TyneSight Photos.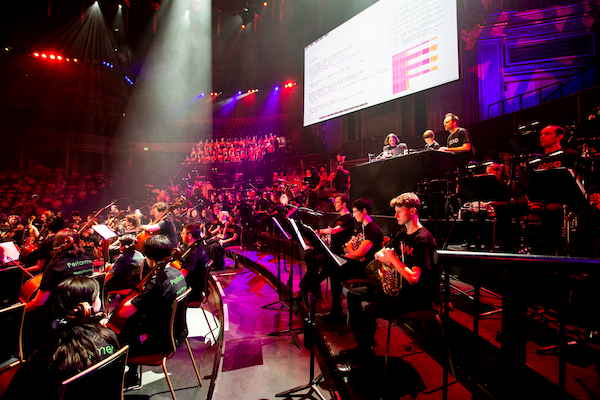 Sonic Pi used as one of the instruments as part of Convo at the Royal
Albert Hall. Photo credit: Pete Jones.
Sonic Pi used as one of the instruments as part of Convo at the Royal
Albert Hall. Photo credit: Pete Jones.